
This article explains how to pair the printer set up in the backend with iCHEF POS. Please complete the backend printer setup first if not done yet.
Two Checks Before Pairing
➊ Allow iCHEF POS to Access iPad Permissions
Please turn on Bluetooth on the iPad and allow Bluetooth and local network access in the iCHEF POS App to ensure smooth printer discovery and pairing.
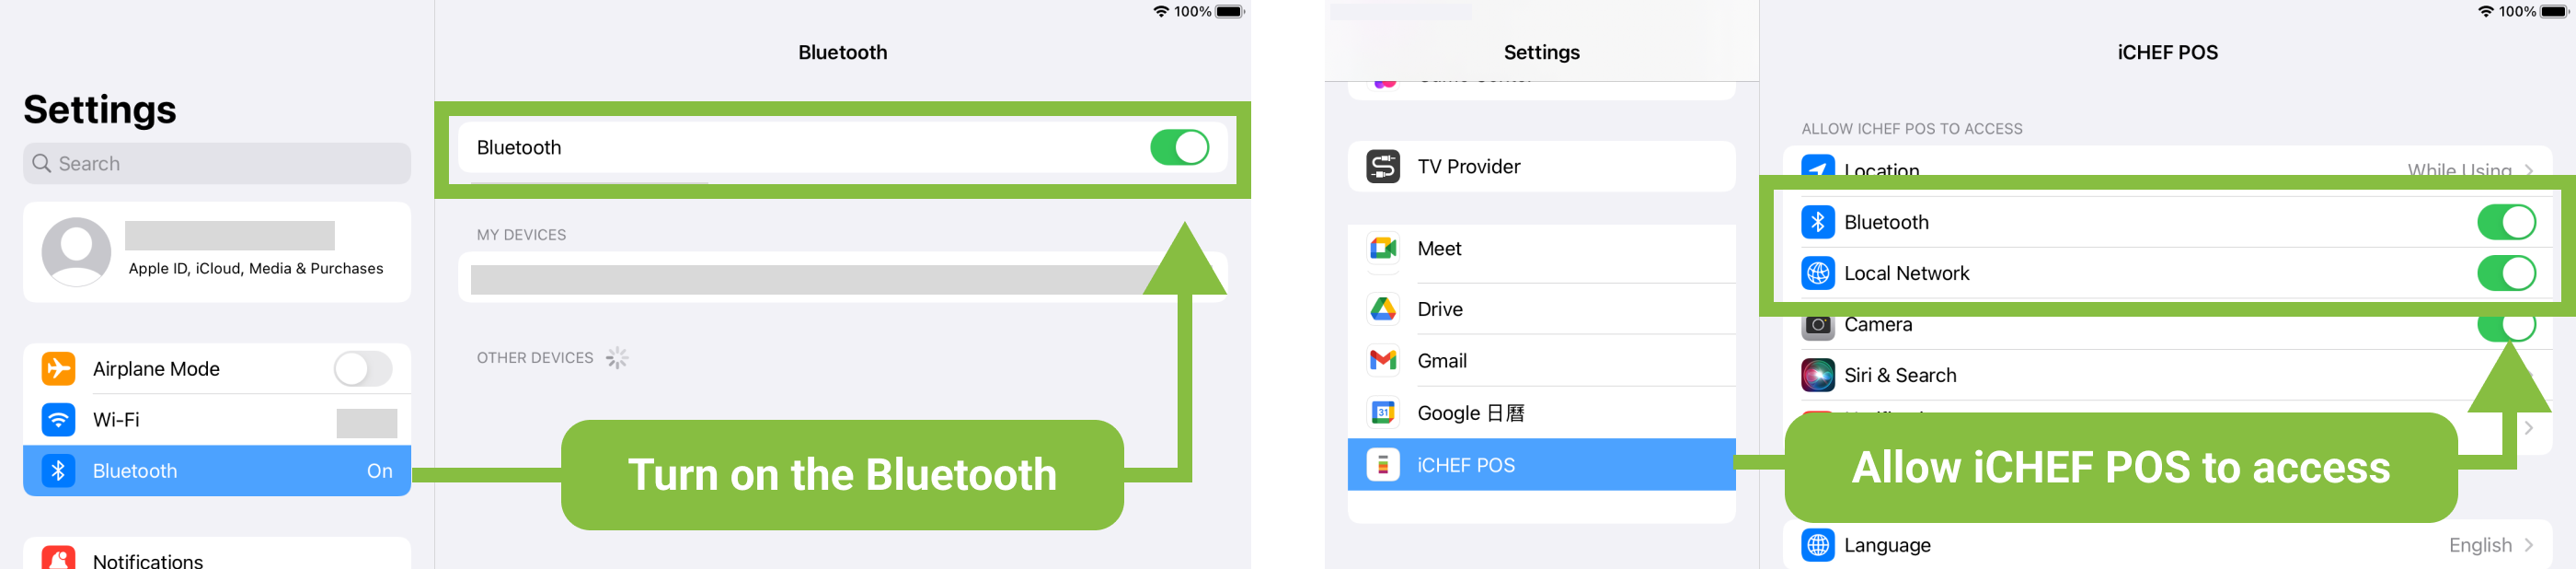
If Bluetooth or local network options are missing in settings, please complete the first login of iCHEF POS.
➋ Printer Connection and IP Address Retrieval
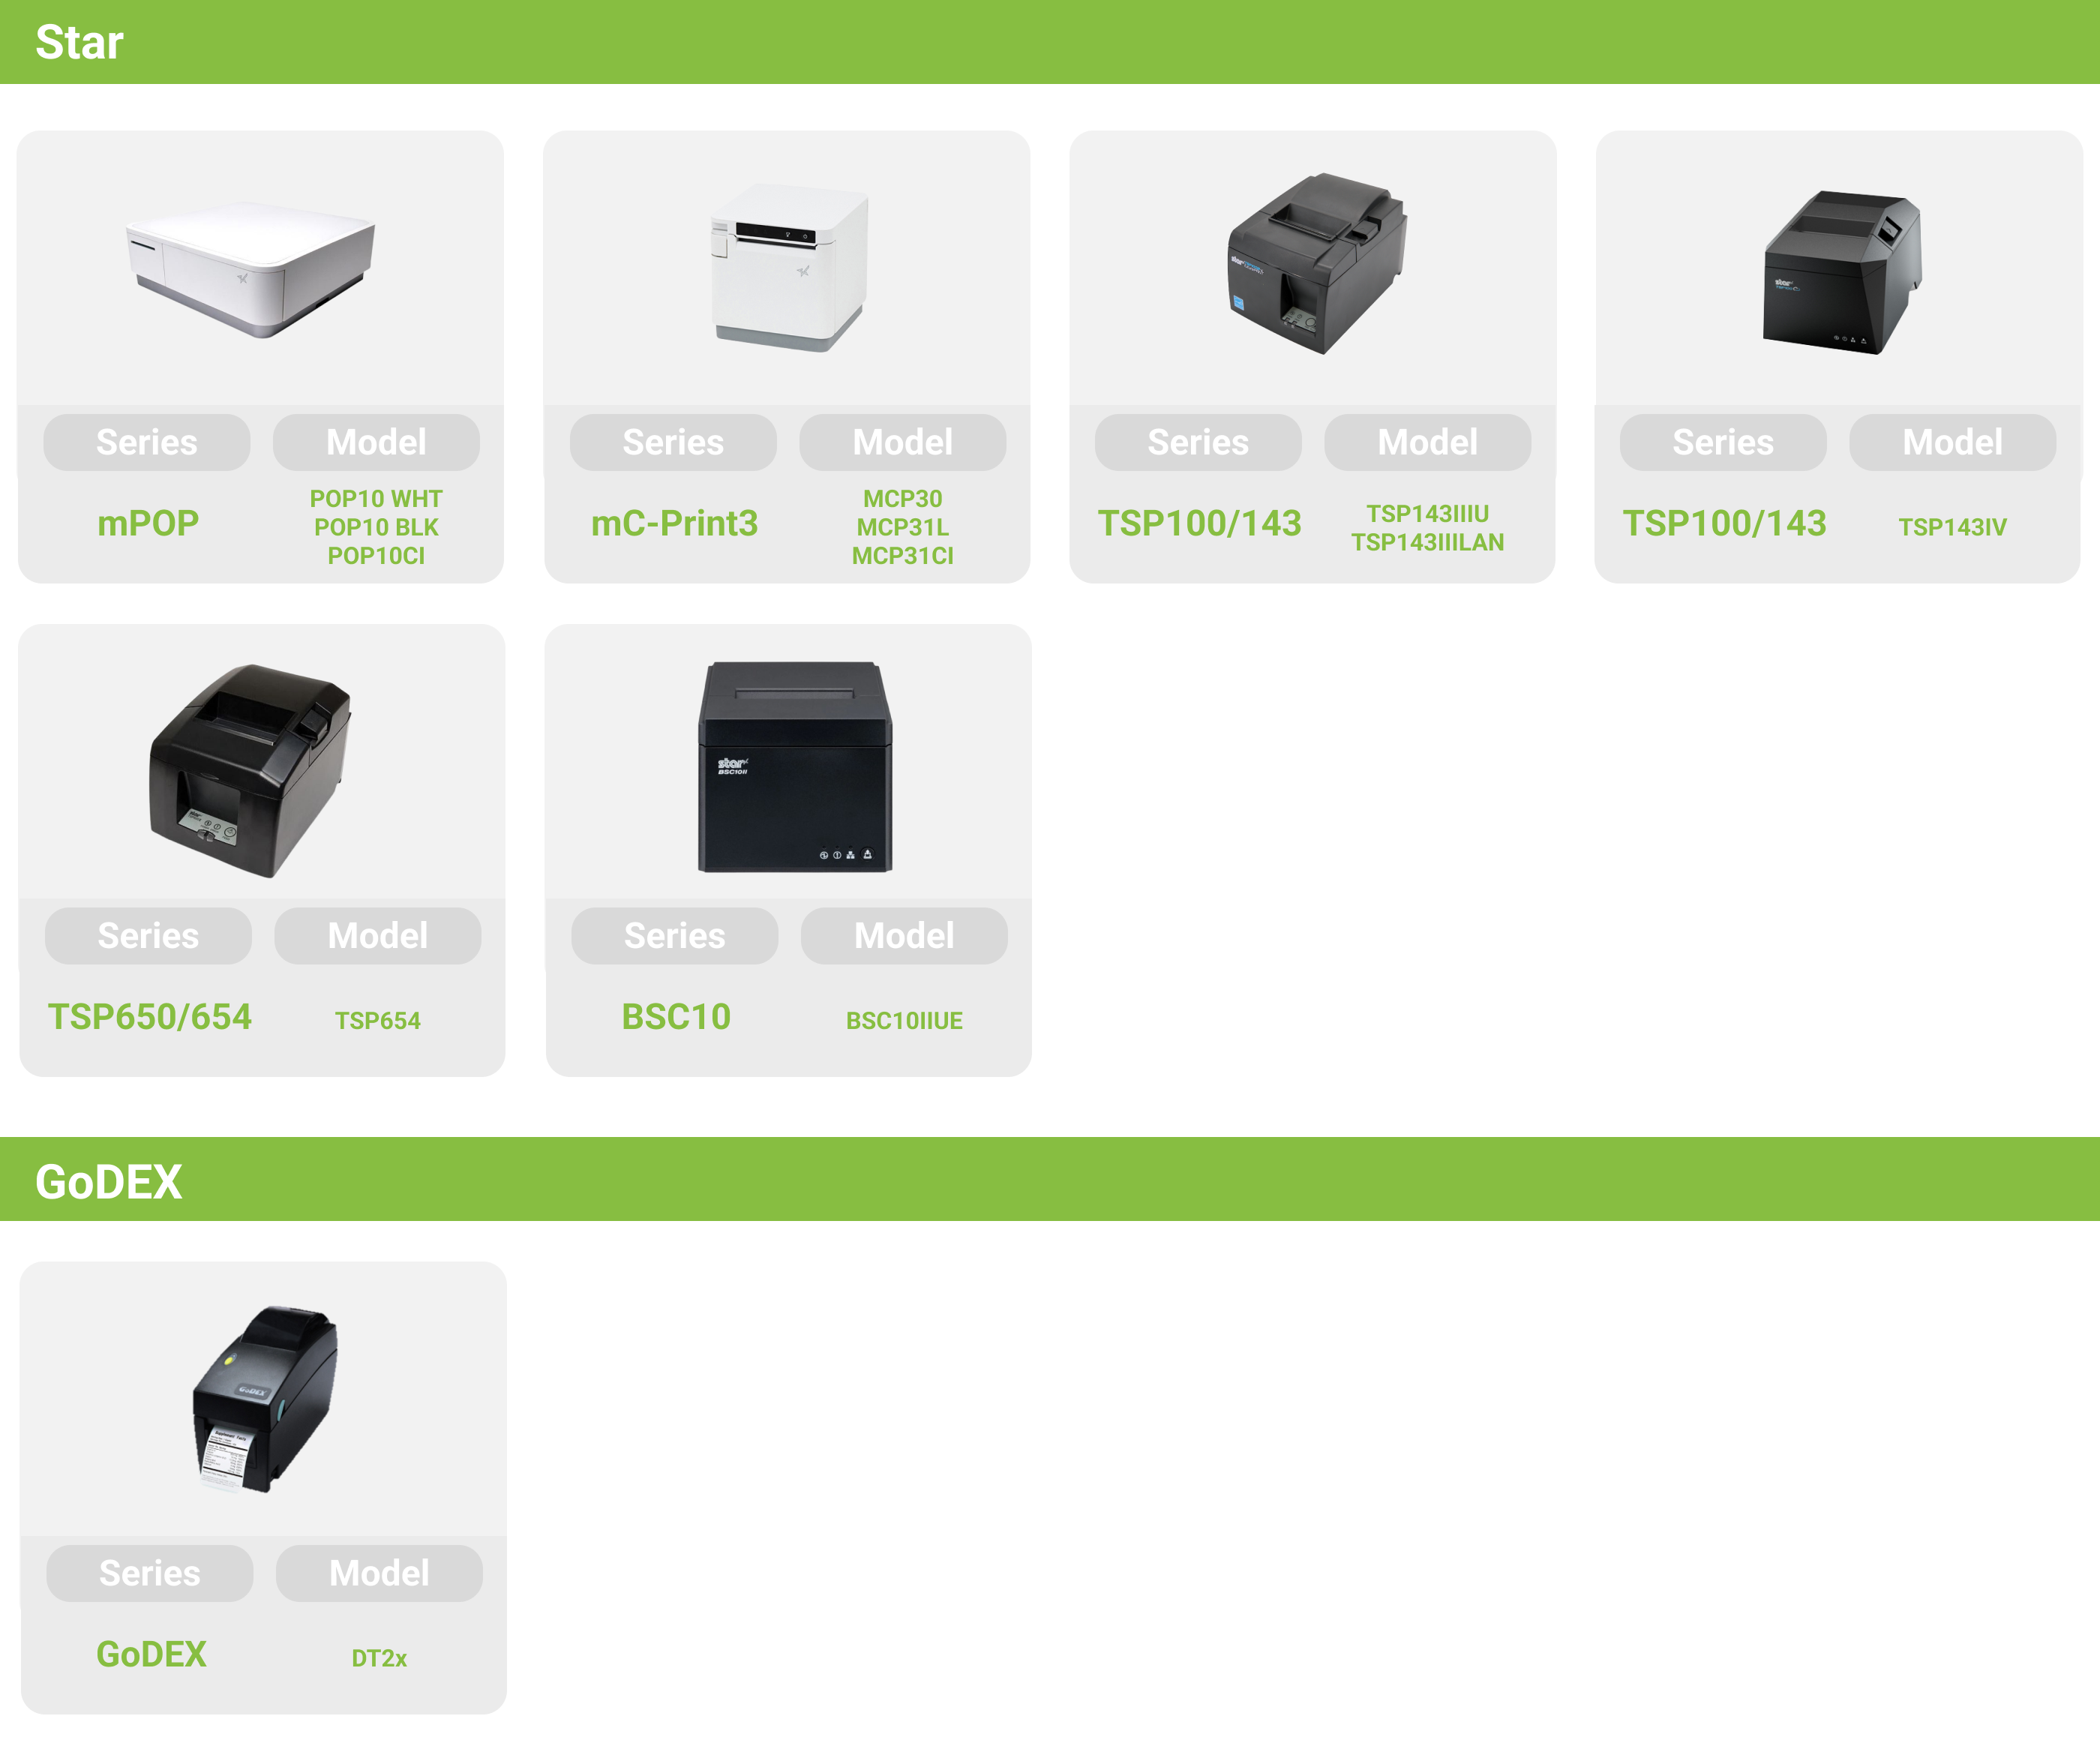
Identify Model by Printer Appearance
Since iCHEF supports multiple printer models, connection and IP settings vary slightly for each device. Please compare the printer appearance below, confirm the series and model, then follow the related instructions.
Supported order printer models vary by restaurant location with iCHEF.Learn More
Get full instructions according to the model
The mPOP printer series supports Bluetooth and USB connections. Please refer to the instructions based on your actual model.
| Model | Connection |
|---|---|
| POP10WHT | Bluetooth |
| POP10BLK | Bluetooth |
| POP10CI | USB(Type-C) |
First, turn on the printer power. Then, go to Bluetooth in the iPad Settings and select the printer from the device list to complete connection.

Turn off the printer power, open the paper drawer, hold the multifunction button (icon ⓷), then turn on the printer power. Release the button only after the printer feeds paper.

The printer will print two self-test receipts. Please check the second receipt to confirm the actual device name.

If the name is not displayed, please try resetting the printer.
Please use an Apple-certified iPad cable to connect the printer’s USB Type-C port to the iPad.

Some mC-Print3 models support both LAN and USB connections. For optimal stability, please choose one connection type based on your needs and follow the corresponding instructions.
| Model | Connection |
|---|---|
| MCP30 | LAN |
| MCP31L | LAN or USB |
| MCP31CI | LAN or USB |
Please connect the printer’s network port to the router’s LAN port using a network cable.

Turn off the printer power, hold the paper feed button, then press the power switch once until the printer starts feeding paper. Release the paper feed button then.

The printer will print two self-test receipts. Check the second receipt for the “IP Address” (third line from the bottom), which is the printer’s IP address.

If the IP shows 0.0.0.0, the printer has not obtained an IP address. Please check the router and try replacing the network cable to troubleshoot.
Please use an Apple-certified iPad cable to connect to the printer.
- For mC-Print3L, please connect to the iPad 2.4V port.
- For mC-Print3CI, please connect to the USB-C port.

The TSP100/143 printer series supports both LAN and USB connections. Please refer to the instructions according to your model.
| Model | Connection |
|---|---|
| TSP143IIILAN | LAN |
| TSP143IIIU | USB |
Please connect the printer’s network port to the router’s LAN port using a network cable.

Turn off the printer power, then hold the paper feed button while turning the power back on. Release the button when the printer starts feeding paper.

The printer will print two self-test receipts. Check the second receipt for the “IP Address” (third line from the bottom), which is the printer’s IP address.

If the IP shows 0.0.0.0, the printer has not obtained an IP address. Please check the router and try replacing the network cable to troubleshoot.
Please use an Apple-certified iPad cable to connect the printer’s USB 5V port to the iPad.

The TSP100/143 (TSP143IV) printer series supports LAN connection only.
| Model | Connection |
|---|---|
| TSP143IV | LAN |
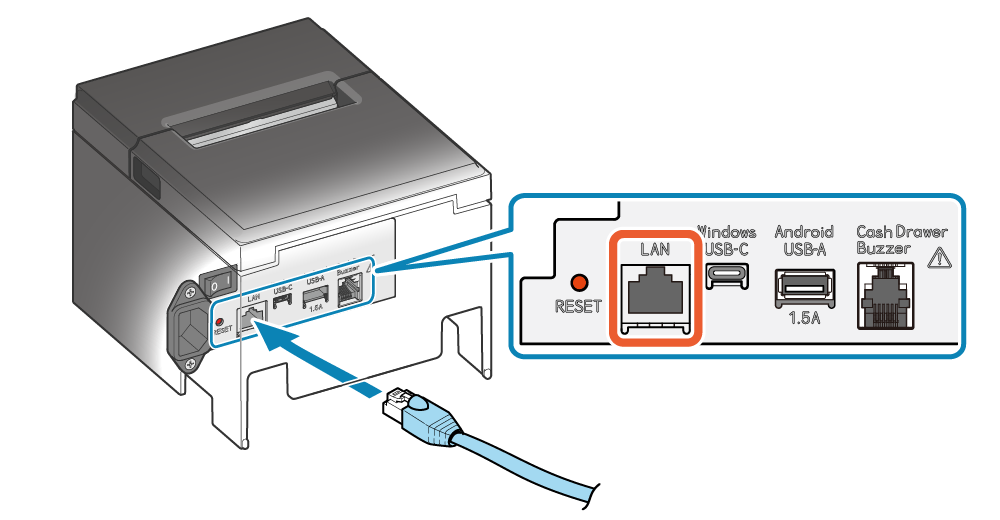
Please connect the printer’s network port to the router’s LAN port using a network cable.

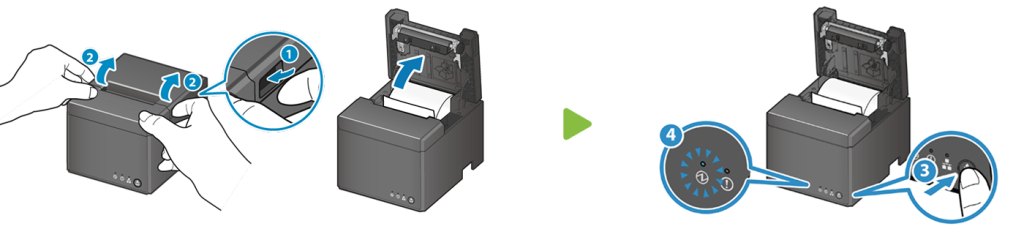
Turn on the printer power and wait for the blue light to come on, then open the paper roll cover.


Hold the paper feed button (icon ③) until the blue light flashes, then close the paper roll cover.


The printer will print two self-test receipts. Check the second receipt for the “IP Address” (third line from the bottom), which is the printer’s IP address.

If the IP shows 0.0.0.0, the printer has not obtained an IP address. Please check the router and try replacing the network cable to troubleshoot.
The TSP650/654 printer series supports LAN connection only.
| Model | Connection |
|---|---|
| TSP654 | LAN |
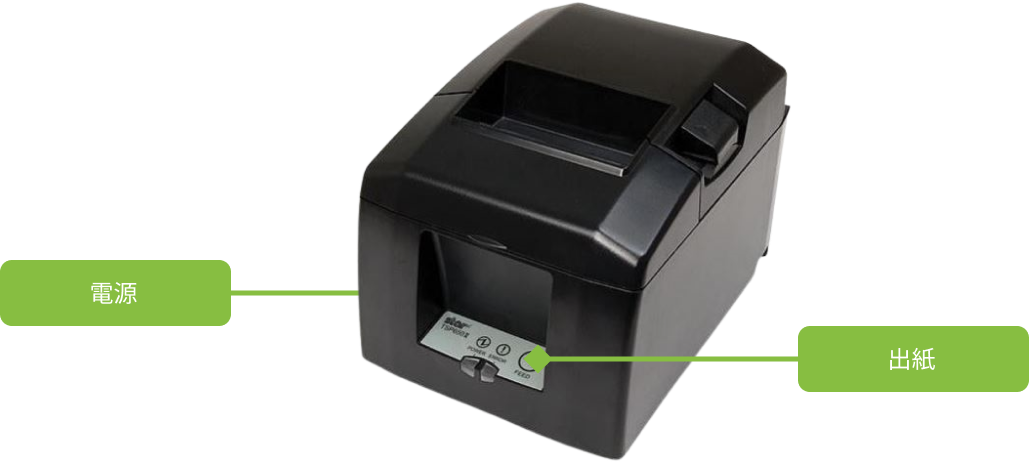
Please connect the printer’s network port to the router’s LAN port using a network cable.

Turn off the printer power, then hold the paper feed button while turning the power back on. Release the button when the printer starts feeding paper.
The printer will print two self-test receipts. Check the second receipt for the “IP Address” (third line from the bottom), which is the printer’s IP address.

If the IP shows 0.0.0.0, the printer has not obtained an IP address. Please check the router and try replacing the network cable to troubleshoot.
| Model | Connection |
|---|---|
| BSC10IIUE | LAN |
Please connect the printer’s network port to the router’s LAN port using a network cable.
Turn on the printer power and open the paper roll cover, then hold the FEED button until the blue power light flashes, then release it.
Close the paper roll cover. The printer will automatically print 2 self-test receipts. Check the 2nd receipt for the printer’s IP address.

The GoDEX (DT2x) printer series supports LAN connection only.
| Model | Connection |
|---|---|
| DT2x | LAN |
Please connect the printer’s network port to the router’s LAN port using a network cable.

Turn off the printer power, hold the feed button, then turn on the power. Release the button after three beeps. When the receipt finishes printing, press the feed button once more to complete paper roll positioning.

The printer will print a self-test receipt. Please check the “IP” between “MAC” and “Gateway” on the receipt for the printer’s IP address.

If no IP information is shown, the printer did not obtain an IP address. Please check that the router is working properly and try replacing the network cable to resolve the issue.
Start pairing
➤ iCHEF POS App:Toolbox > Device Management> Printer
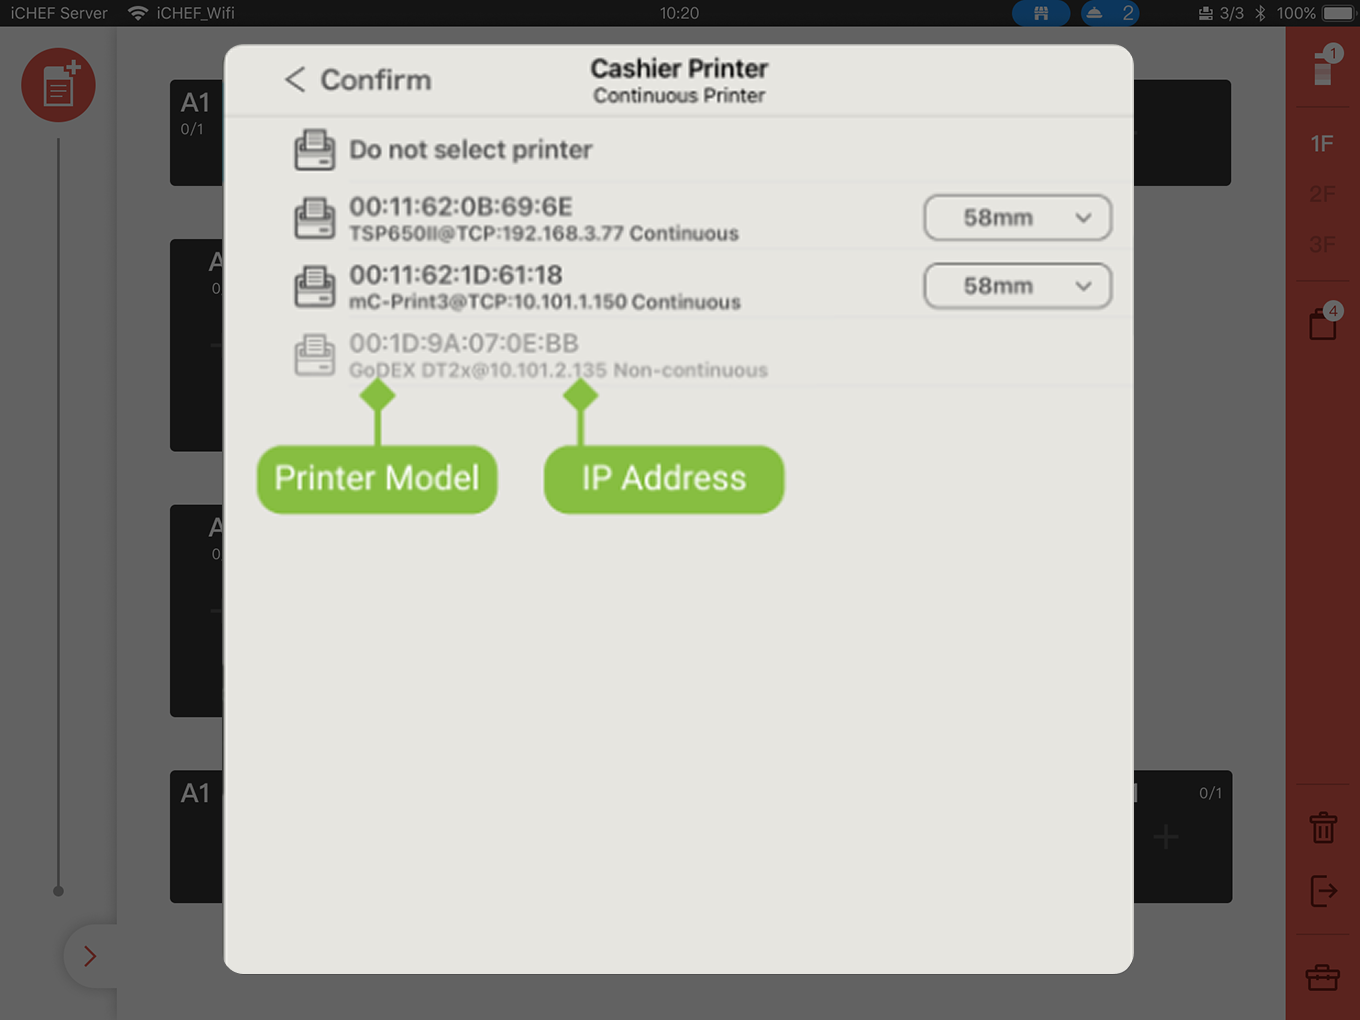
After applying the new settings and logging into iCHEF POS, you can see the printer list in Device Management, matching the backend.

After selecting a printer from the list, you can find and pair the physical printer by model or IP address.
FAQ
Log out of iCHEF POS, then log in with “Update Menu” to get the latest printer list.
The iPad’s Wi-Fi and the printer must be on the same local network.
Open Wi-Fi settings on the iPad, tap the “i” icon next to the current Wi-Fi, and check if the first three sets of numbers in the IP addresses of the iPad and printer match.

iCHEF POS must have permission for the iPad’s local network.
Open iCHEF POS in iPad settings and confirm if the “Local Network” permission is enabled.

Please confirm the cable is an Apple certified original.
To ensure stable data transfer, use an Apple-certified (MFi) cable (how to identify certified Apple cables). Disconnect and reconnect both ends, then check if the iPad shows the charging icon.

Non-(MFi) certified cables may only charge but cannot transfer data.
Check if the iPad is connected to the printer.
Turn on Bluetooth in iPad settings and check if mPOS is connected in the device list.

iCHEF POS requires permission to access iPad Bluetooth.
Open iPad settings, find iCHEF POS, and make sure Bluetooth permission is enabled.
