Under normal circumstances, when connecting the printer to the iCHEF POS, you can directly use the IP address assigned by the router. Only in rare cases, due to in-store network management requirements, is it necessary to configure a static IP.
How to Set Static IP
Only printers with LAN connection support can have a static IP configured. Please refer to the printer comparison table below and choose the appropriate configuration method accordingly.
Supported order printer models vary by restaurant location with iCHEF.Learn More
Static IP is only provided for printers with LAN connections. Depending on the model, the setting method is slightly different.
Before operating, please connect the printer to the router using a physical Ethernet cable to obtain a dynamic IP address. Also, ensure the iPad is connected to the same internal network via Wi-Fi.
First, turn off the printer power. Press and hold the “Feed” button, then turn on the power. Release the button when the printer starts feeding paper.

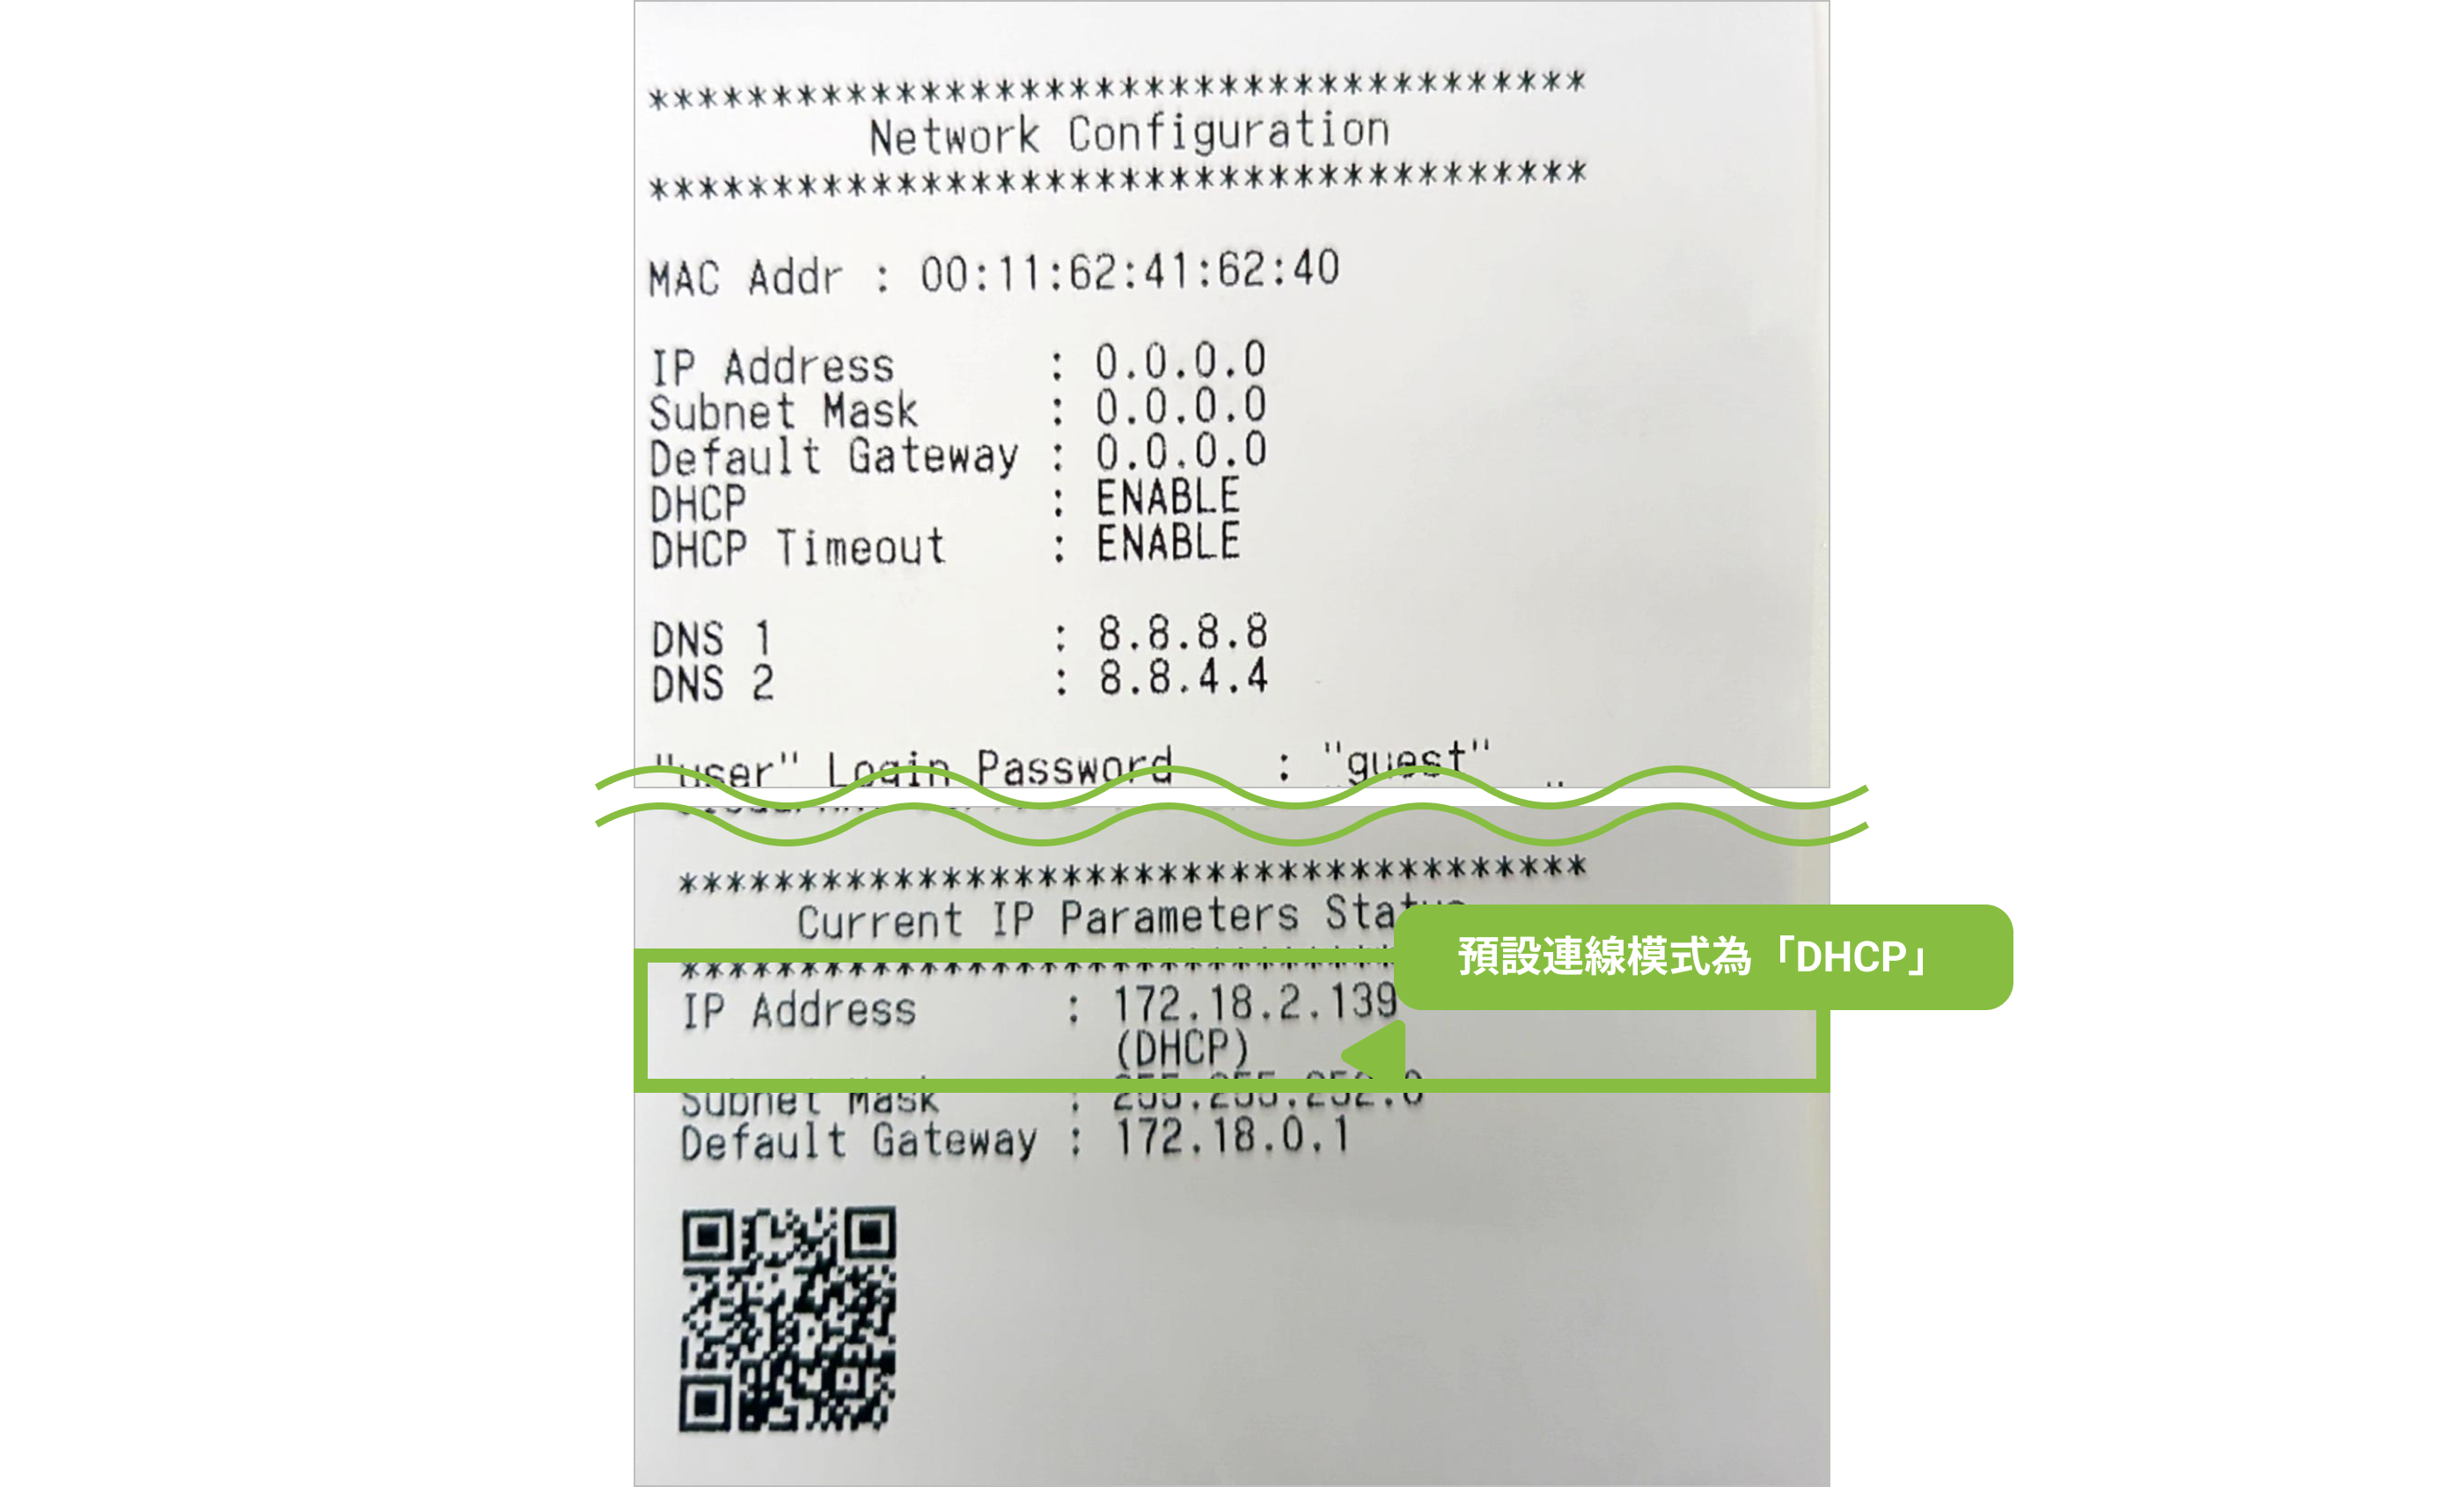
The printer will print two test receipts; please check the second one to obtain the dynamic IP address. Then, open a browser on the iPad and enter that IP address in the address bar.

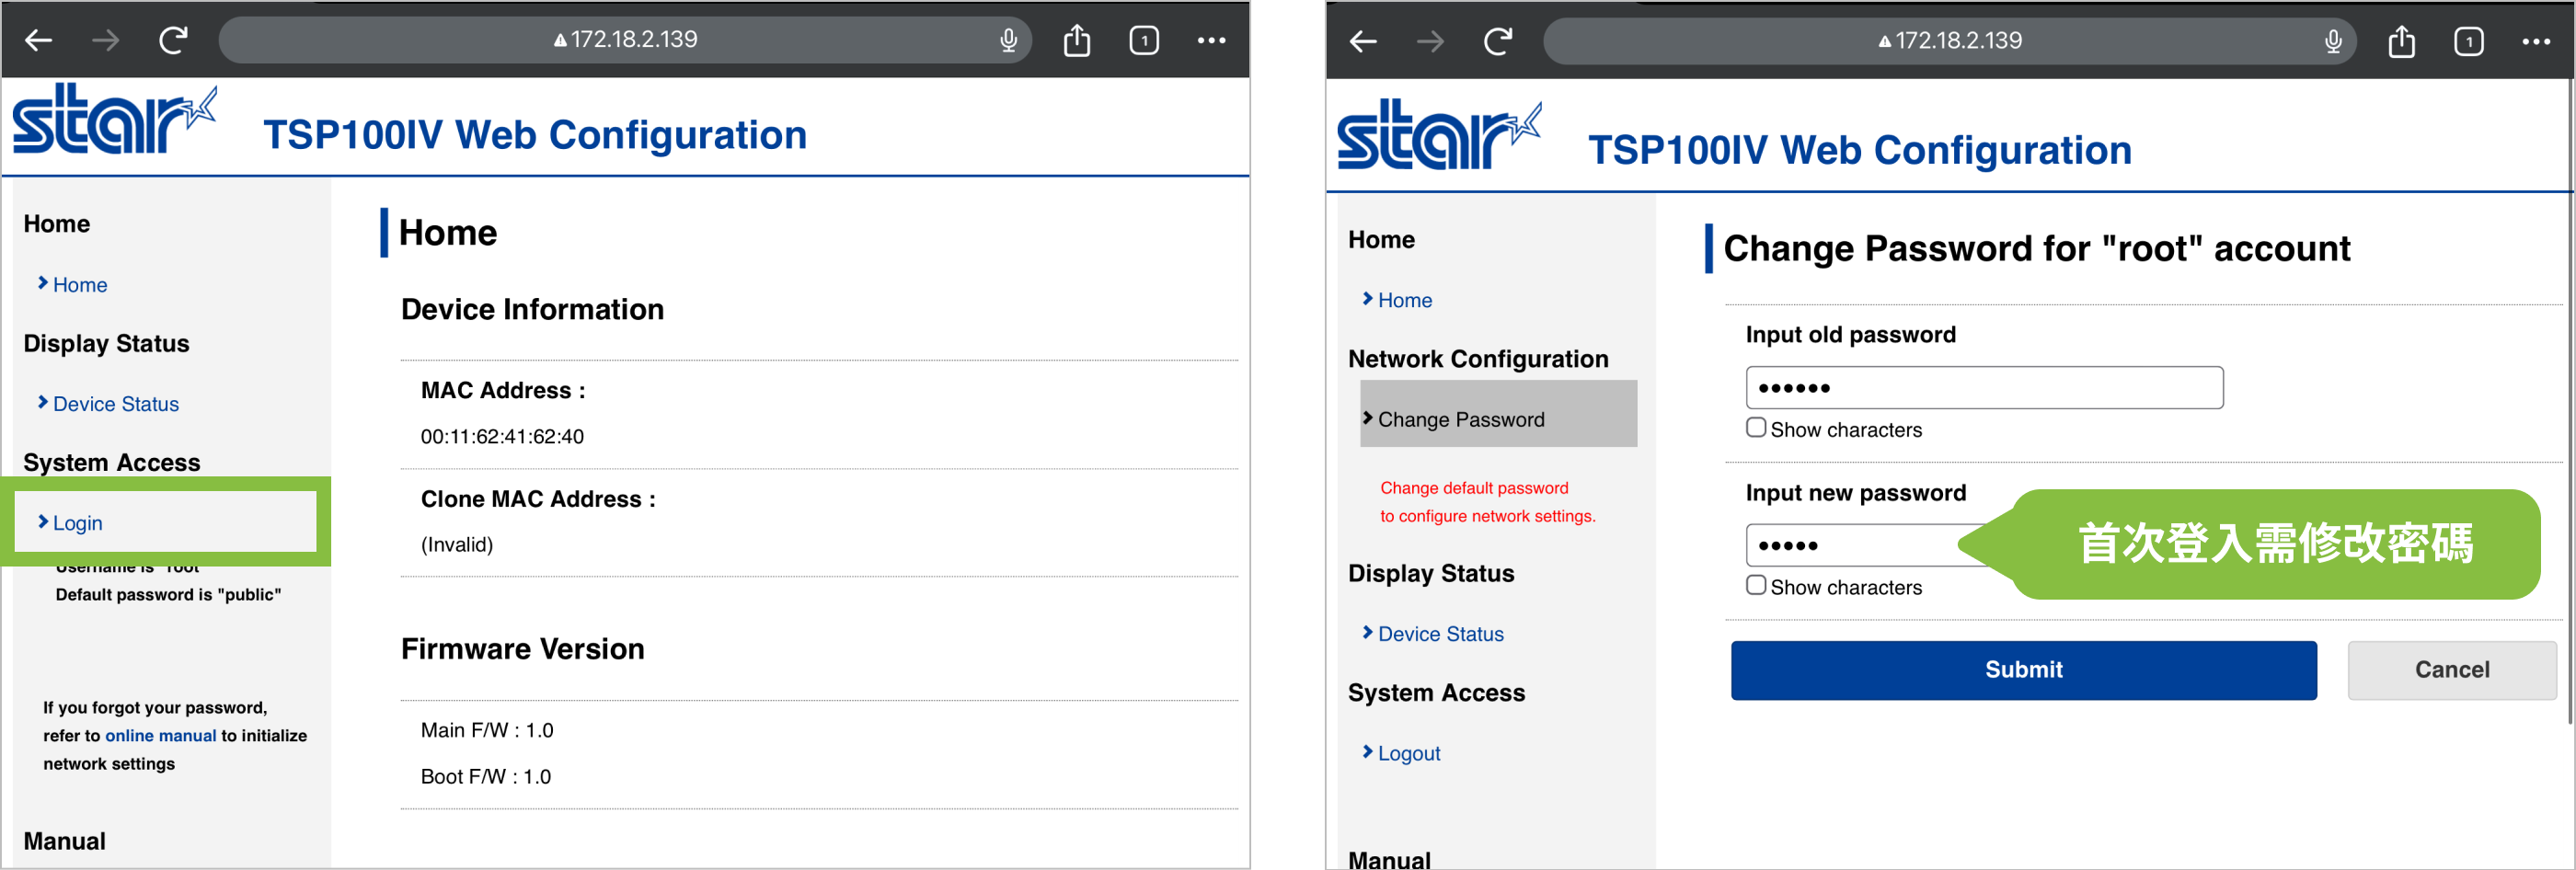
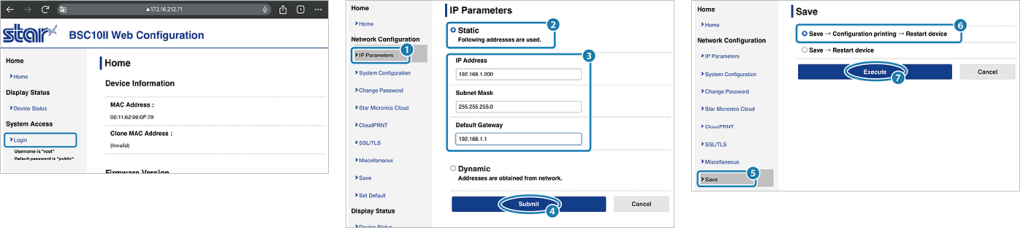
After accessing the printer’s network settings page, click on Login and enter the default username “root” and password “public” .

After the first login, the system will require you to change the default password.
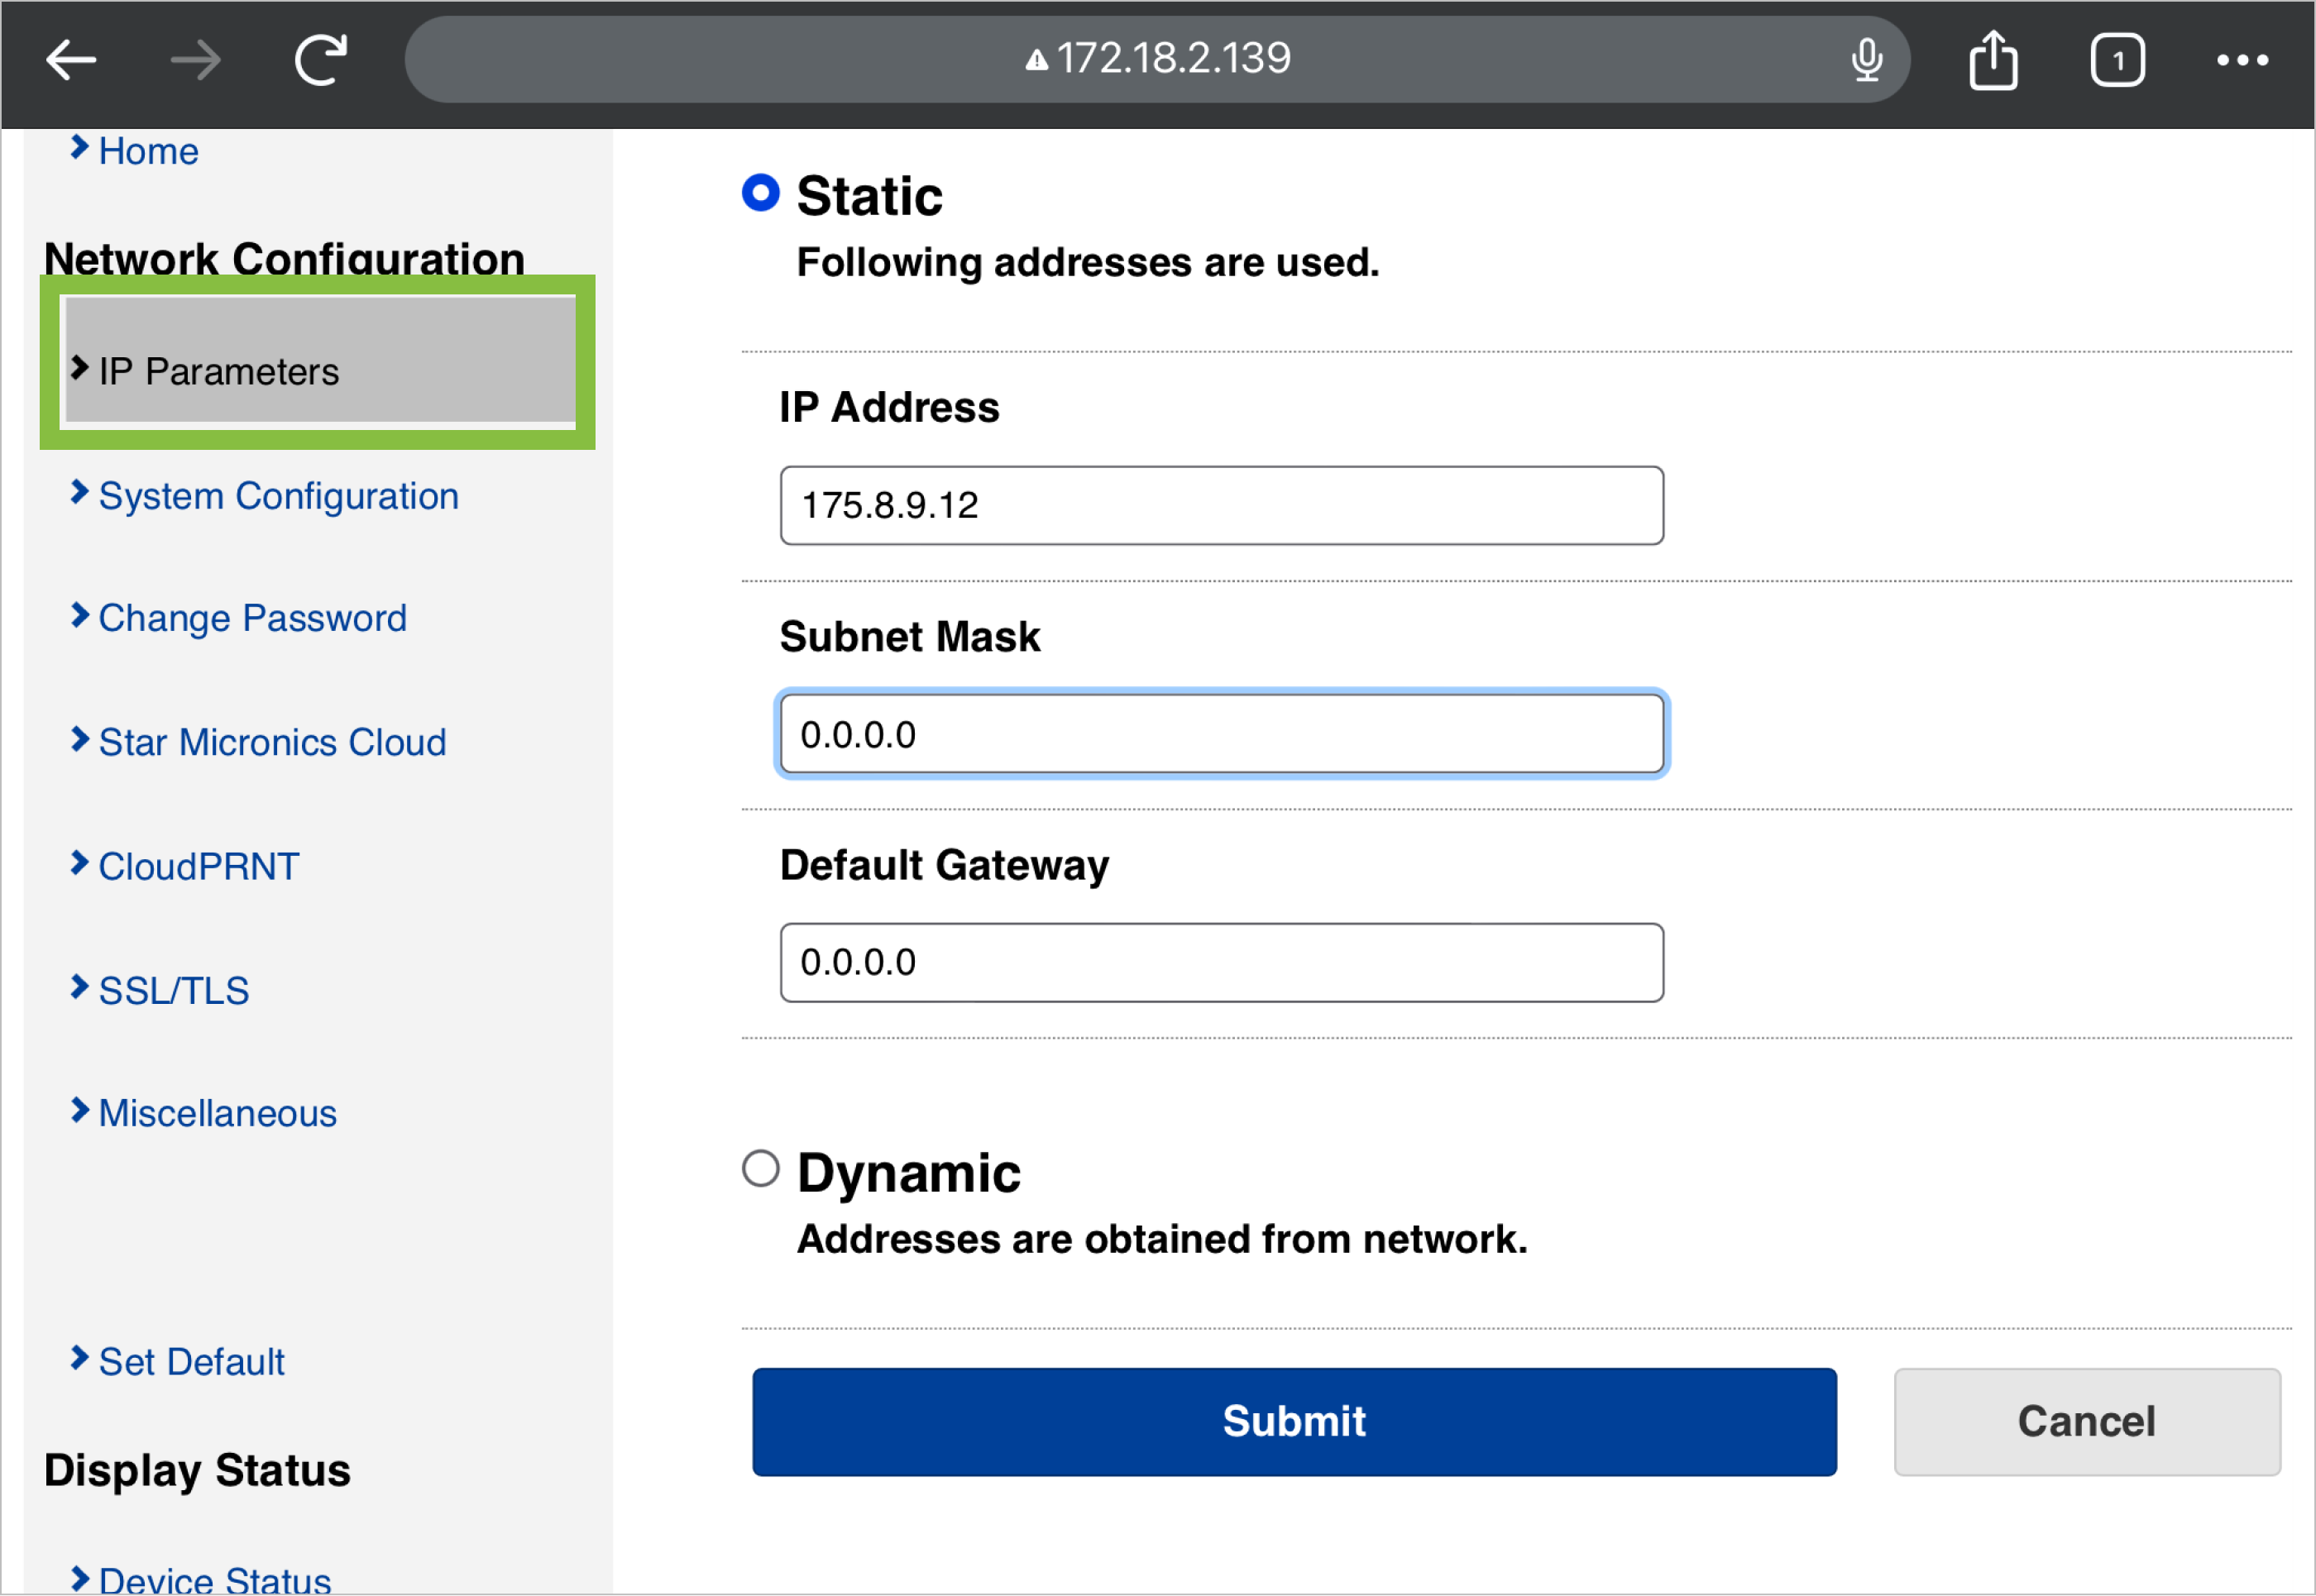
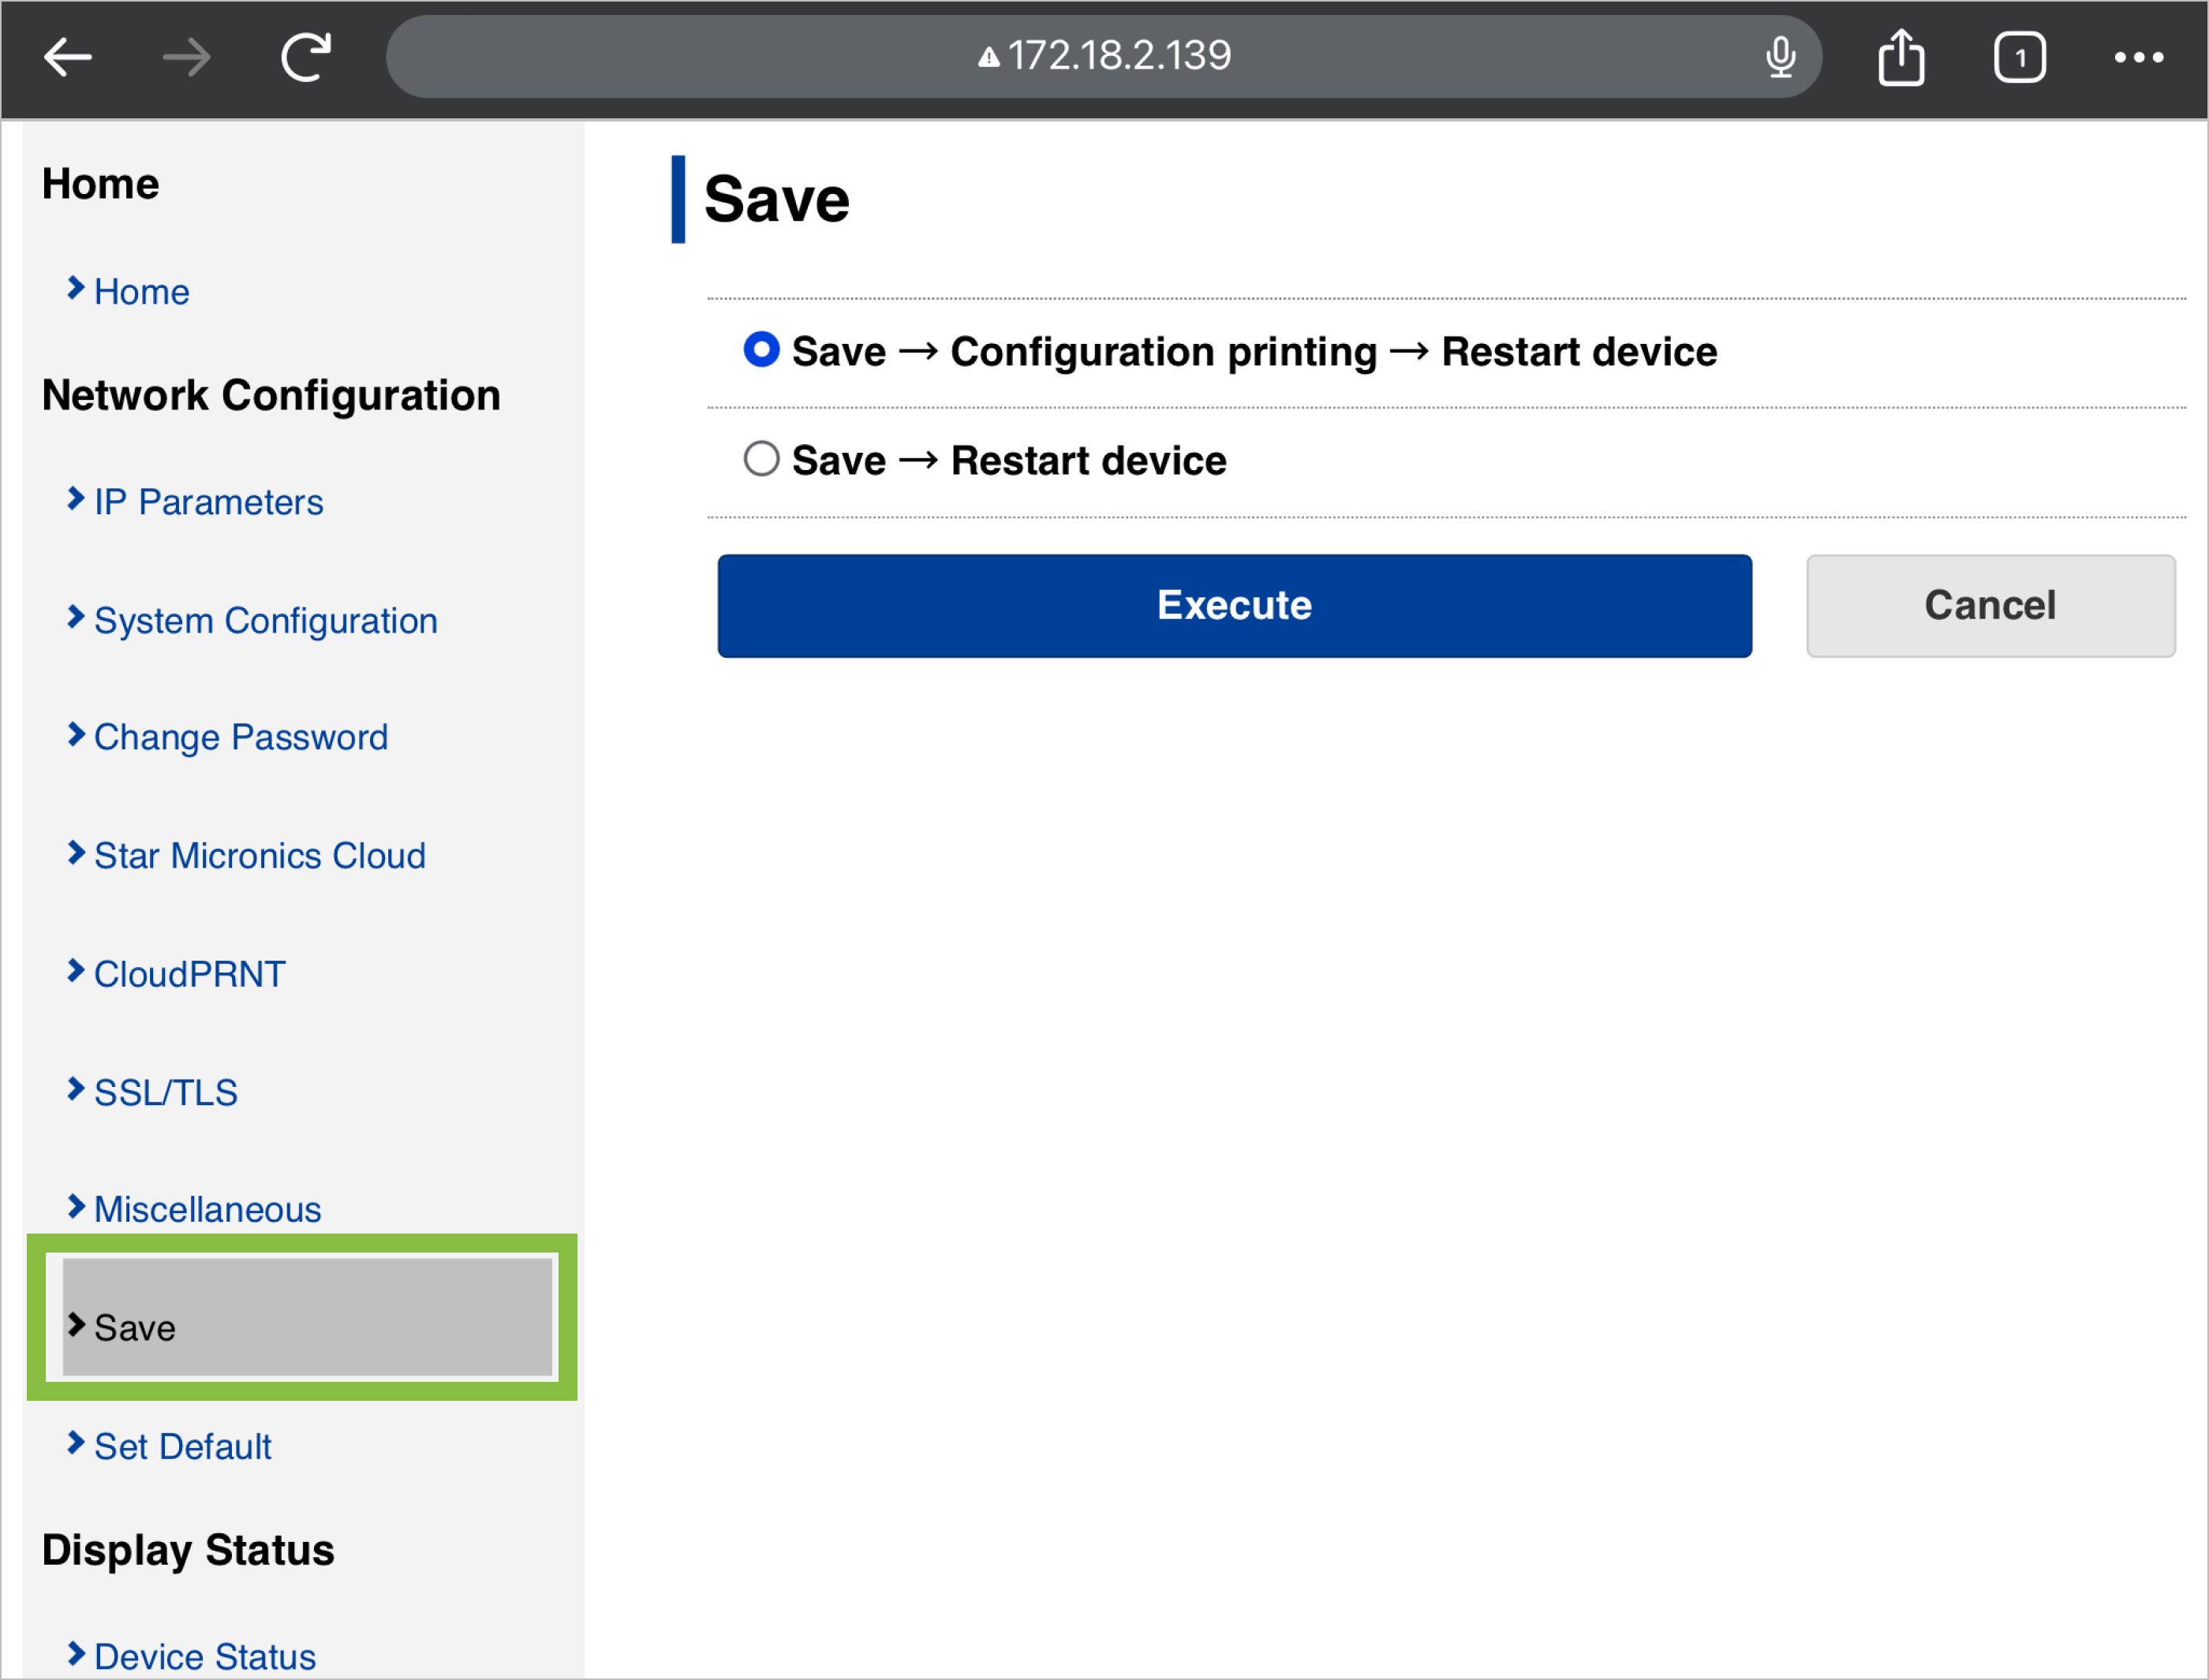
Click on IP Parameters, select Static, enter the static IP address and subnet mask, then click Submit to complete the configuration.

Click Save, then select Save → Configuration Printing → Restart device, and finally press Execute to complete the configuration.

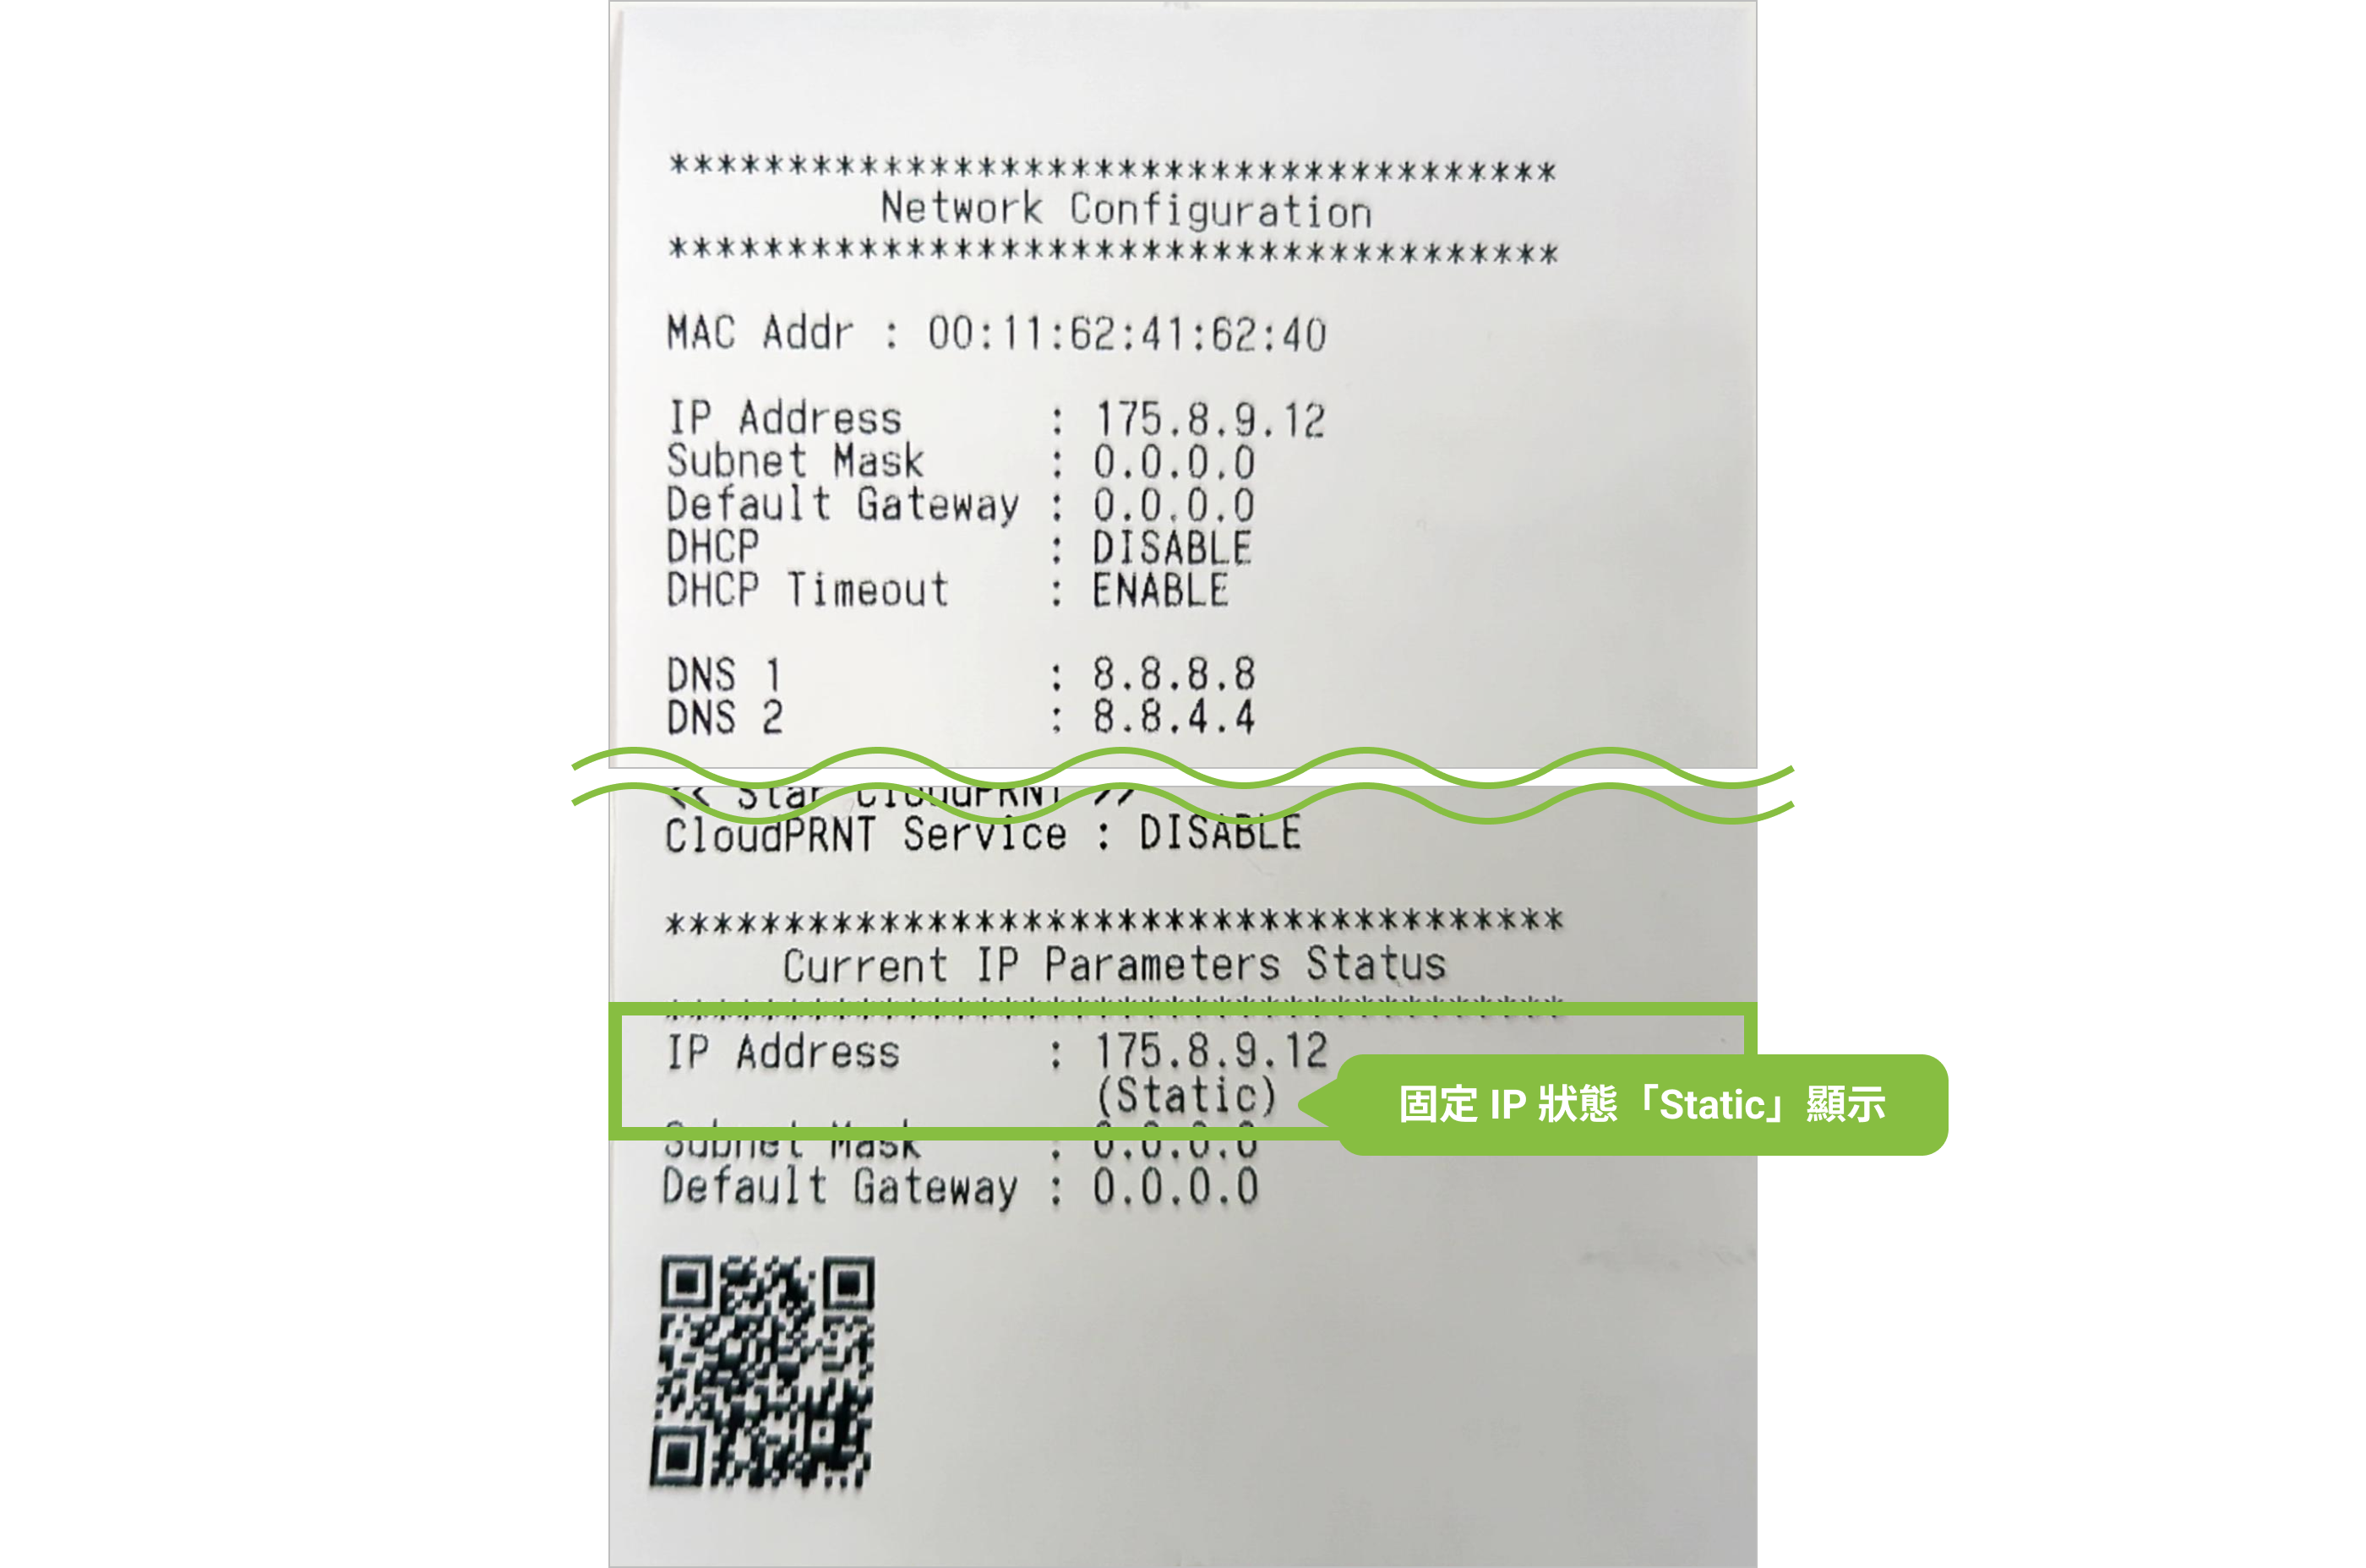
At this point, the printer will automatically restart. After restarting, it will automatically print the completed IP configuration information.

First, turn off the printer power. Press and hold the “Feed” button, then turn on the power. Release the button when the printer starts feeding paper.

The printer will print two test receipts; please check the second one to obtain the dynamic IP address. Then, open a browser on the iPad and enter that IP address in the address bar.

After accessing the printer’s network settings page, click on Login and enter the default username “root” and password “public” .

After the first login, the system will require you to change the default password.
Click on IP Parameters, select Static, enter the static IP address and subnet mask, then click Submit to complete the configuration.

Click Save, then select Save → Configuration Printing → Restart device, and finally press Execute to complete the configuration.

At this point, the printer will automatically restart. After restarting, it will automatically print the completed IP configuration information.

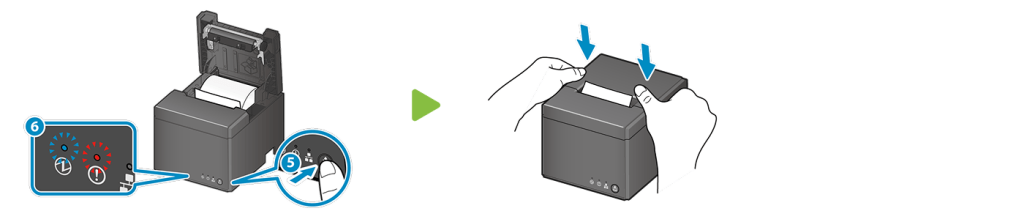
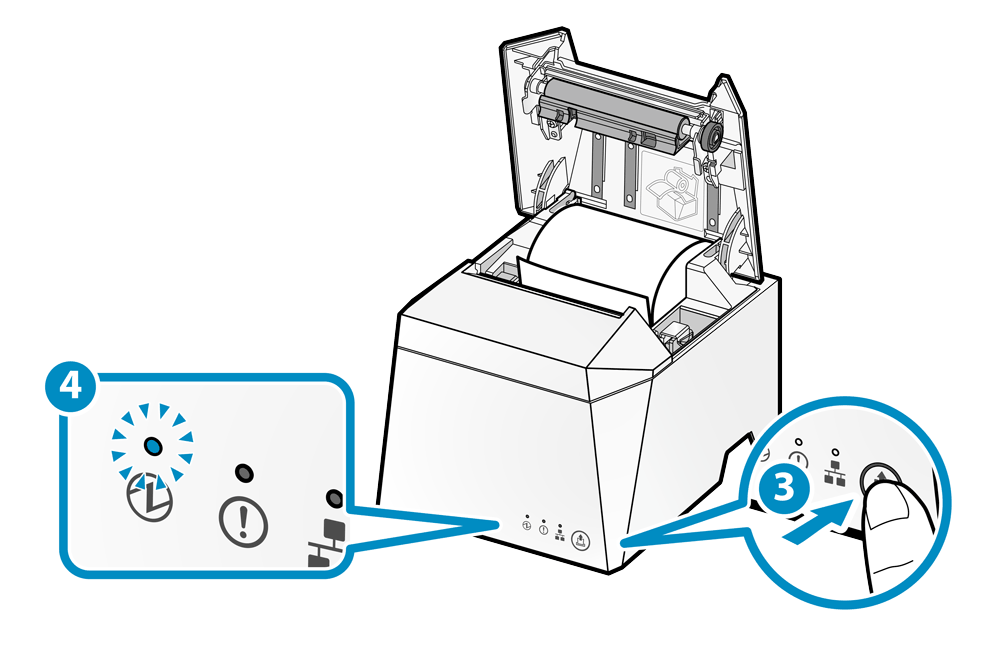
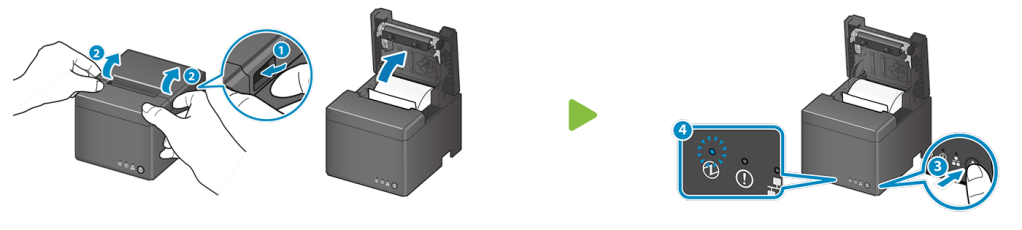
Turn on the printer power and wait for the blue light to come on, then open the paper roll cover.


Hold the paper feed button (icon ③) until the blue light flashes, then close the paper roll cover.


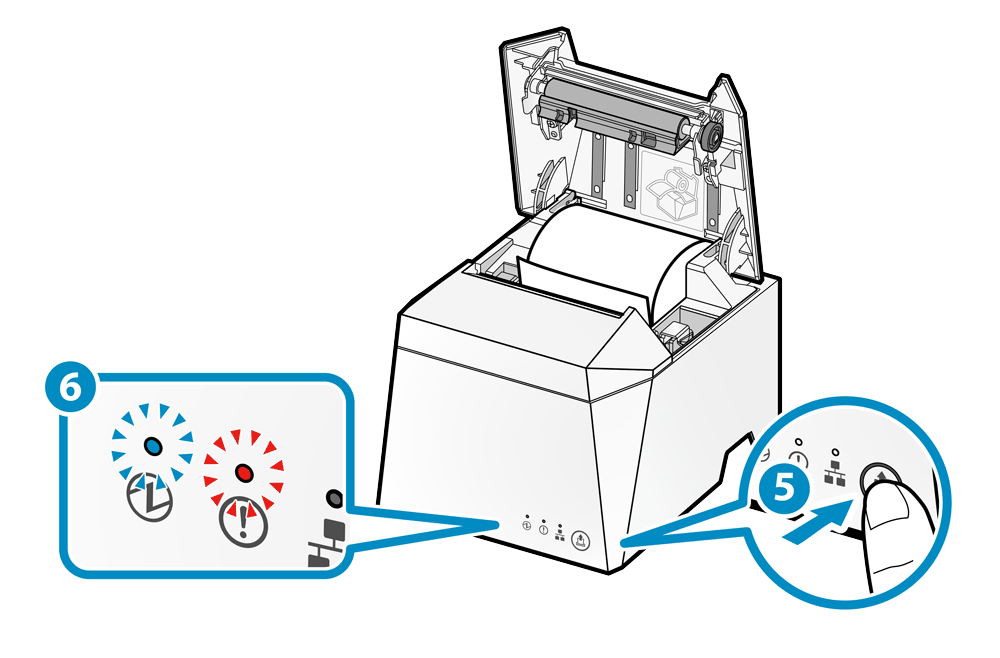
The printer will print two test receipts; please check the second one to obtain the dynamic IP address. Then, open a browser on the iPad and enter that IP address in the address bar.

After accessing the printer’s network settings page, click on Login and enter the default username “root” and password “public” .
Click on IP Parameters, select Static, enter the static IP address and subnet mask, then click Submit to complete the configuration.
Click Save, then select Save → Configuration Printing → Restart device, and finally press Execute to complete the configuration.
At this point, the printer will automatically restart. After restarting, it will automatically print the completed IP configuration information.
First, turn off the printer power. Press and hold the “Feed” button, then turn on the power. Release the button when the printer starts feeding paper.
The printer will print two test receipts; please check the second one to obtain the dynamic IP address. Then, open a browser on the iPad and enter that IP address in the address bar.

After accessing the printer’s network settings page, click on Login and enter the default username “root” and password “public” .

Click on IP Parameters, select Static, enter the static IP address and subnet mask, then click Submit to complete the configuration.

Click Save, then select Save → Configuration Printing → Restart device, and finally press Execute to complete the configuration.

At this point, the printer will automatically restart. After restarting, it will automatically print the completed IP configuration information.

Obtain the printer’s IP address
Turn on the printer power and open the paper roll cover, then hold the FEED button until the blue power light flashes, then release it.

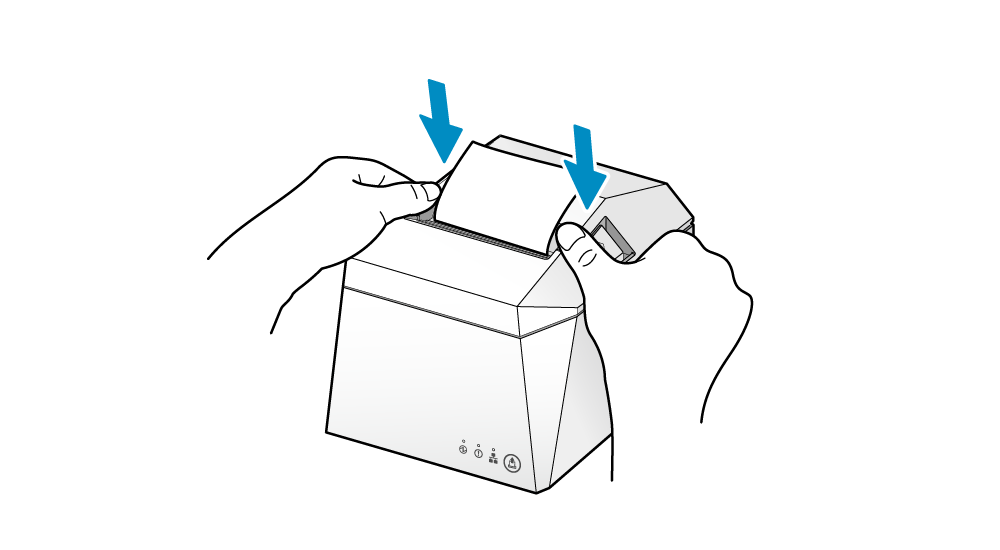
Close the paper roll cover. The printer will automatically print 2 self-test receipts. Check the 2nd receipt for the printer’s IP address.

Printer Network Interface Configuration
Please enter the printer’s IP address into the browser on the iPad to access the network settings page. From the left menu, click Login and enter the default username: admin, and password: public. After logging in, enter the static IP information in the “IP Parameters” menu. When finished, click “Save” to apply the settings to the printer.
Before starting the setup, please complete the following three preparations:
1. Connect the printer: Use a network cable to connect the printer to the in-store router.
2. Install the software: Download and install the NetSetting official tool on a Windows computer.
3. Confirm network connection: Ensure that both the computer and the printer are connected to the same local area network.
Turn off the printer power, hold the feed button, then turn on the power. Release the button after three beeps. When the receipt finishes printing, press the feed button once more to complete paper roll positioning.

The printer will print a self-test receipt. Please check the “IP” between “MAC” and “Gateway” on the receipt for the printer’s IP address.

Open the NetSetting official tool on the Windows computer, click the magnifying glass icon, and select the printer you want to configure.

Enter the Network page and input the default password (1111).

Set the connection mode to Static IP, enter the static IP address and subnet mask, then click Apply. The printer will restart to apply the settings.

To verify if the printer has been set to a static IP, turn off the printer’s power, press and hold the paper feed button until you hear beeping sounds, then release it. The system will automatically print a receipt, from which you can confirm whether the IP address has changed.
Reset Printer / Initialize Network Settings
Only printers that support LAN connection can reset the network interface. Please refer to the following printer comparison table and choose the corresponding configuration method.
Supported order printer models vary by restaurant location with iCHEF.Learn More
Before operating, please connect the printer to the router using a physical Ethernet cable to obtain a dynamic IP address. Also, ensure the iPad is connected to the same internal network via Wi-Fi.
First, turn off the printer’s power. Then, use a pen to press and hold the RST button on the back while turning the power back on.

When the printer’s blue light stays on steadily and the green light flashes, release the RST button.

Press and hold the paper feed button, and when you hear the cutter reset “click” sound from the printer, the network interface reset is complete.
Please turn off the printer’s power, open the paper roll cover, then press and hold the paper feed button while turning the power on.

When the printer’s indicator lights alternate flashing between red and blue, you may release the paper feed button.

Please close the printer’s paper roll cover. When the printer’s indicator lights alternate slow flashing between red and blue, turn off the power to complete the network interface reset.

Turn on the printer’s power and confirm that the blue light on the indicator panel stays on continuously.
Open the printer’s paper roll cover.

Press and hold the paper feed button, then release it when the blue light starts flashing.
Press and hold the paper feed button again, then release it when the blue and red lights flash simultaneously.
Close the printer’s paper roll cover.
The printer will automatically restart, and upon completion, it will automatically print the network card information.
Please switch the printer power to “ON” and check the “RST” position in the socket area as well as the red and green indicator lights next to the network port.

Use a pen to press and hold the “RST” button. When the network port lights follow this sequence: red and green lights flashing simultaneously → red light flashing alone → green light flashing alone → red and green lights flashing simultaneously again, you can release the “RST” button.

Please gently press the “RST” button once with a pen; the red and green lights on the network port will all turn off.
If the lights on the network port do not turn off, the operation was unsuccessful. Please try again.
Finally, switch the printer power switch to “OFF” to complete the network card reset.
Turn on the printer power and open the paper roll cover, then hold the FEED button until the blue power light flashes, then release it.
Press and hold the FEED button again until the power blue light and the error red light start flashing simultaneously, then release it. Close the paper roll cover, and the printer will automatically print a self-test receipt, indicating that the reset was successful.