The iCHEF POS App ordering page contains order information, the menu, and the Items Consumed list. Through this page, you can take customer orders and send the order details to the receipt printer.

I. Order Information
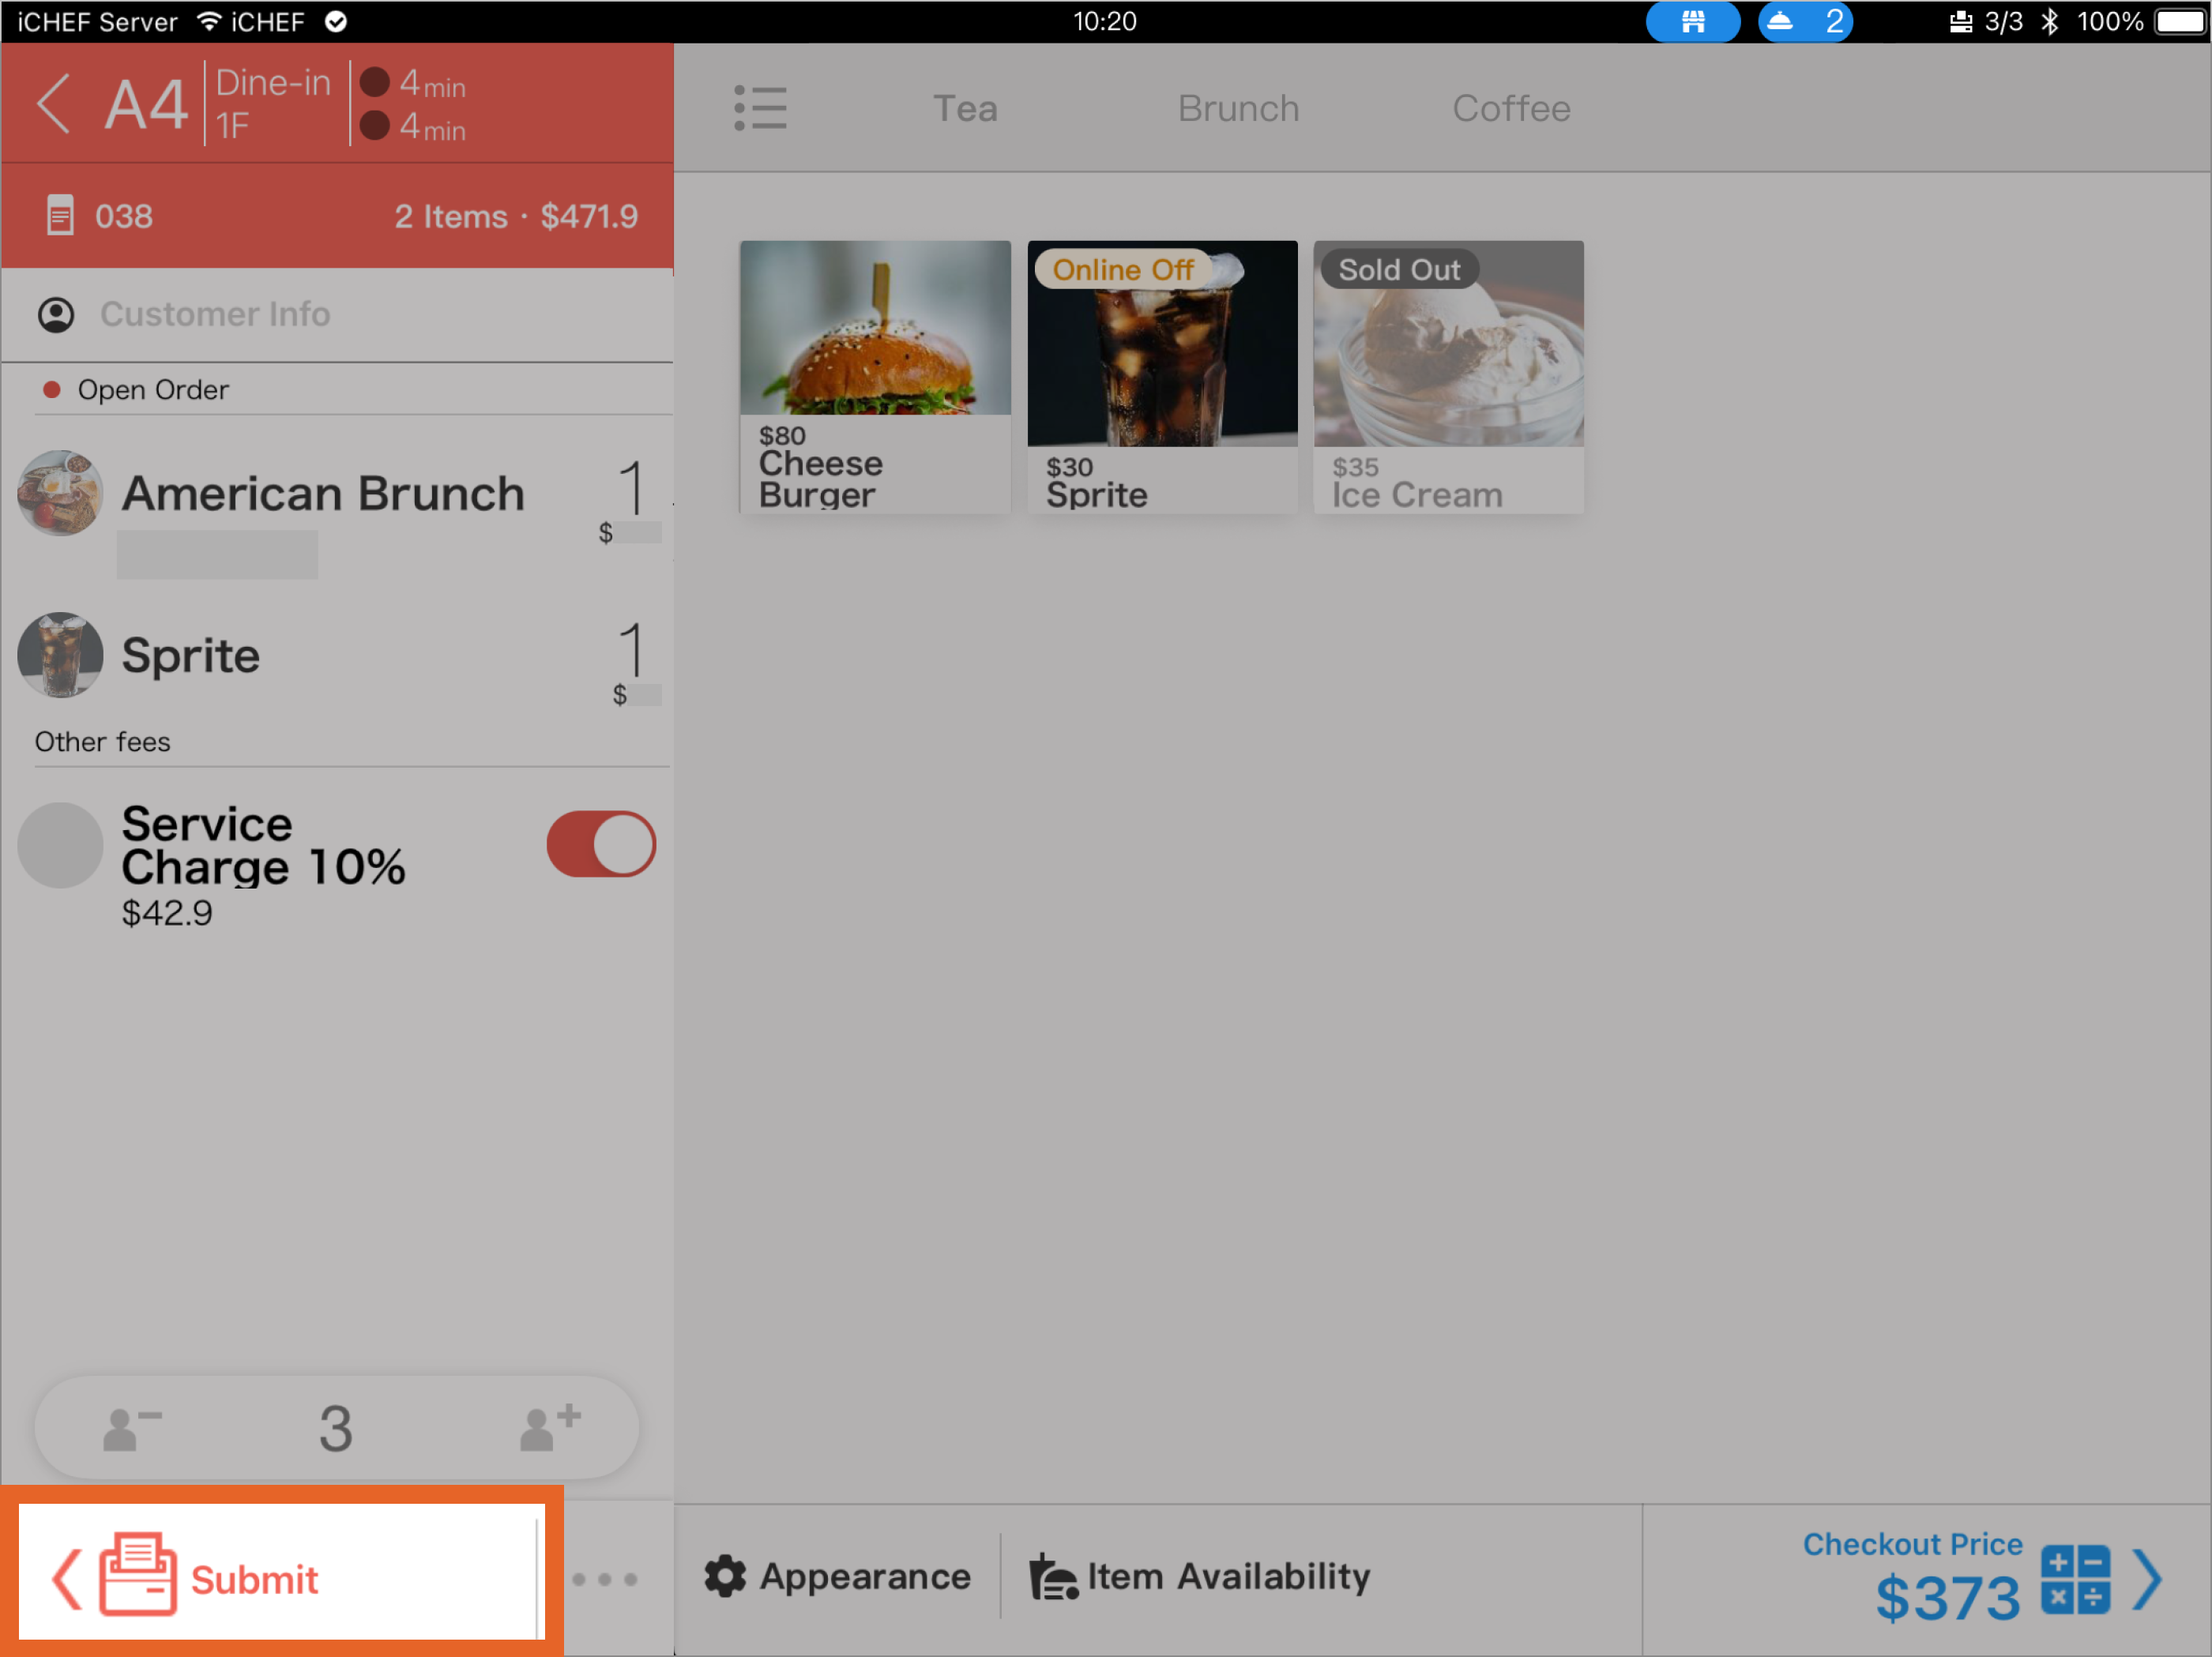
The left side of the order screen is dedicated to Order Information, displaying basic details like the order number and order type. Here, you can also edit operational details such as Customer Info, Order Notes, and Diners.
❶ Information View
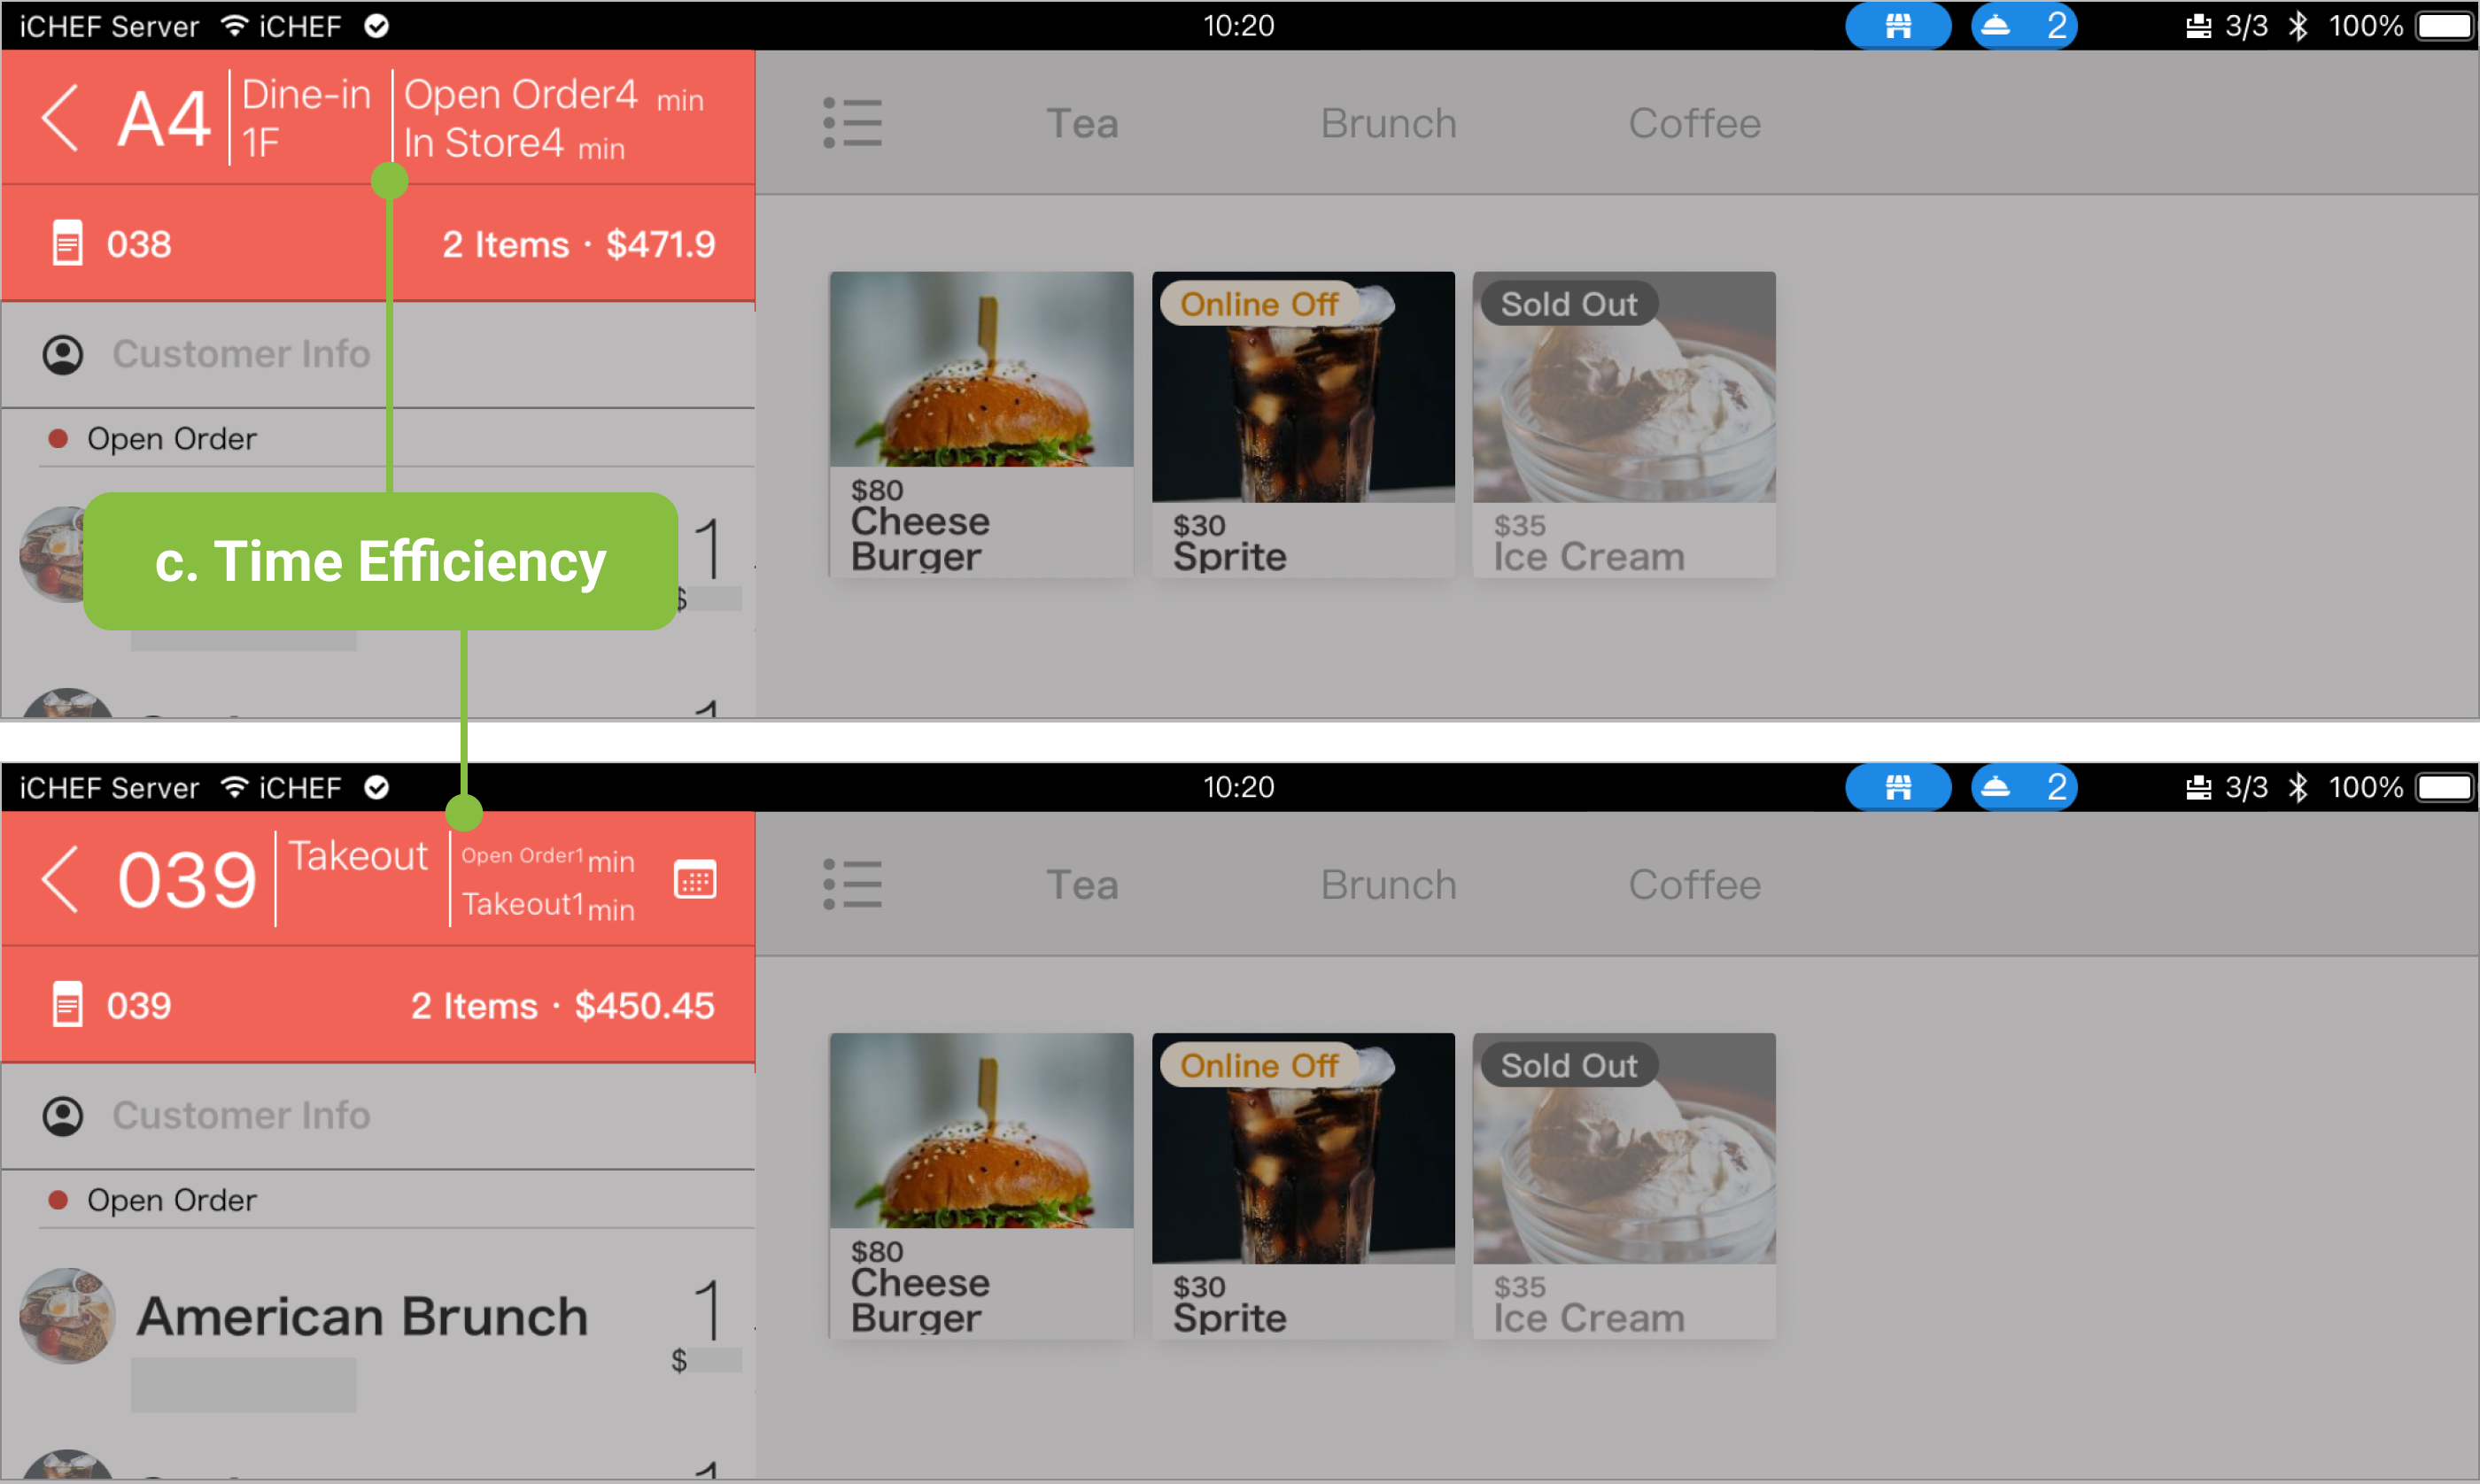
- Table No. / Order No.: Displays the table number for dine-in orders; displays the order number for takeout orders.
- Order Type: Includes the floor number for dine-in; includes the pickup time for takeout.
- Time Efficiency: Time is automatically calculated from the creation of the order until it leaves the store. This allows you to observe time efficiency. (Click to switch view modes: Time only / Text + Time)
- Total Items: Allows you to quickly see the total Item Quantity of both “A La Carte Items” and “Set Menu Items.”
- Original Amount: This field displays the Original Amount of the order before any discounts or promotions are applied.


❷ Information Input
- Customer Info: Enter the customer’s mobile number to automatically search for member data, or use this to register them as a new member.
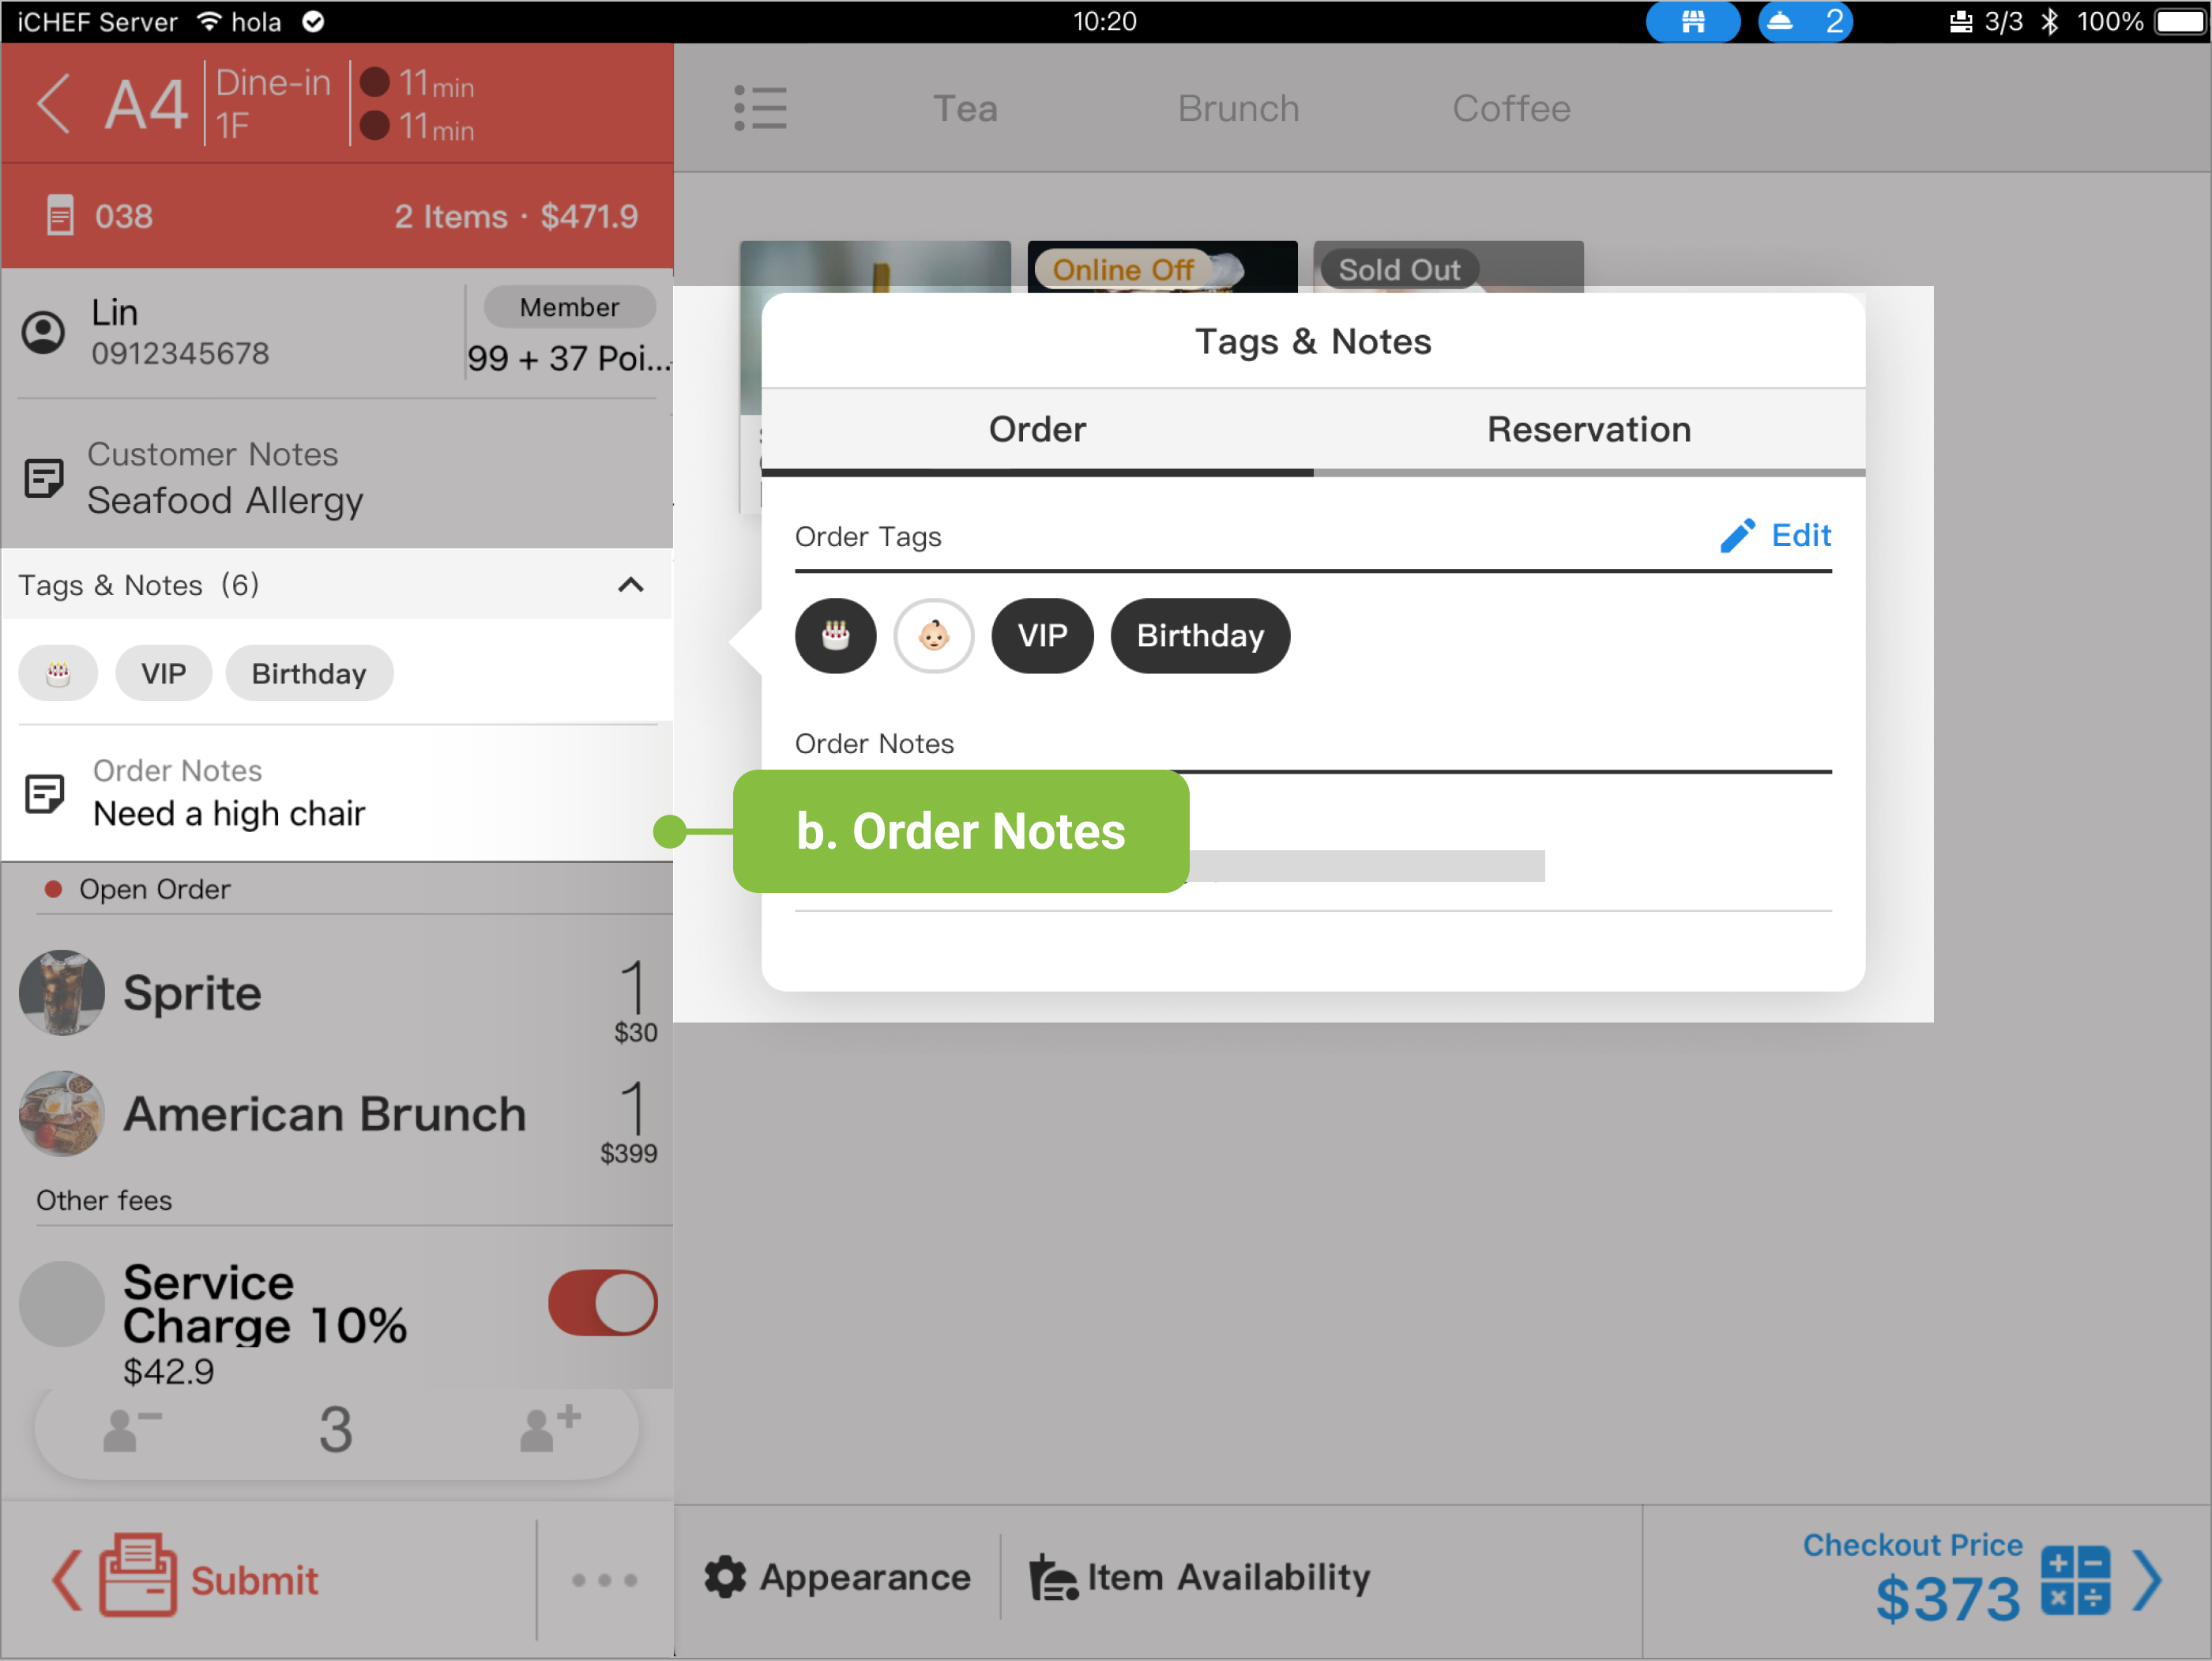
- Tags & Notes: You can record service tags and notes for the current transaction.
- Diners: Before the order is checked out, tap the avatar icon to edit the number of diners. The inputted number of diners will be reflected in the Diner Analysis report in the Backend, helping you understand your store’s customer composition and average transaction value.
- Save and Return: Click the “<” button to save the operations within the order and return to the floor plan/table status page.


Note on Diner Calculation: Dine-in QR Code Ordering defaults to counting the number of devices that scanned the QR Code; Takeout/Delivery defaults to 1 person. The final report will be based on the number of diners recorded at the time of checkout.
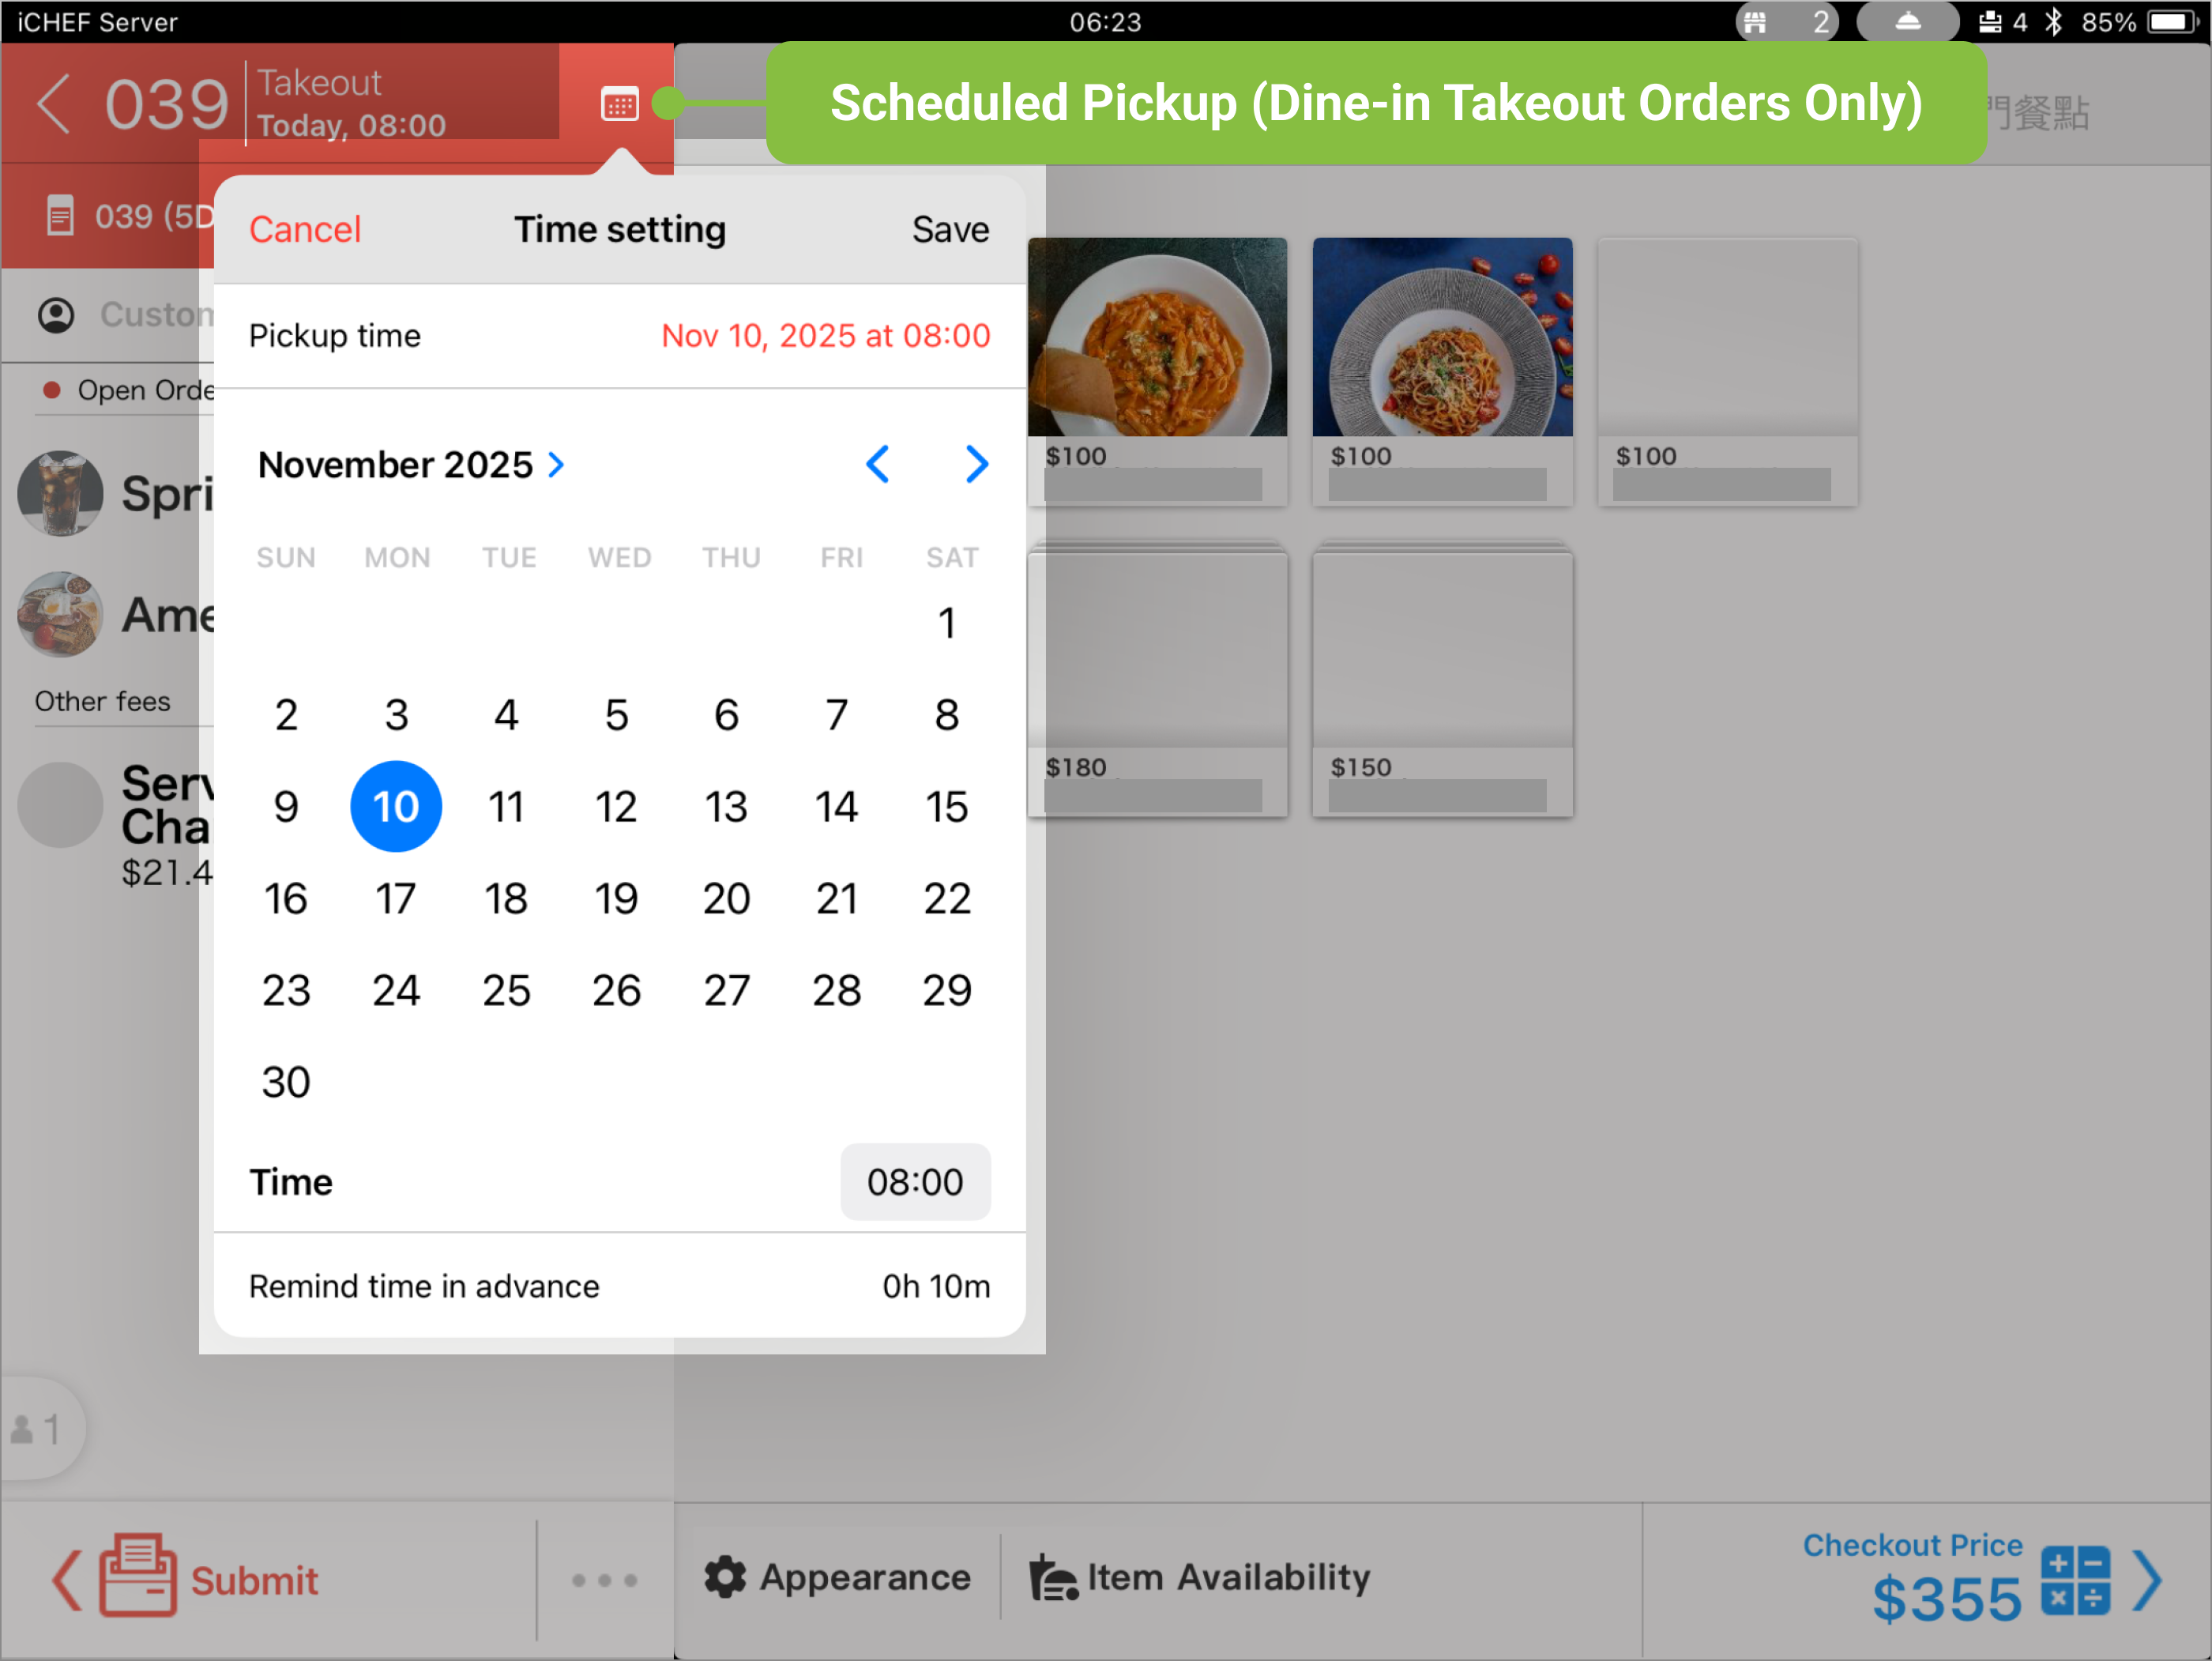
❸ Extended Operation
- Scheduled Pickup (Dine-in Takeout Orders Only): Click the calendar icon to select a future time for pickup.
The right panel of order displays the menu, of which the layout and view can be switched between different settings. You will be prompted to entering the checkout process after creating an order here.
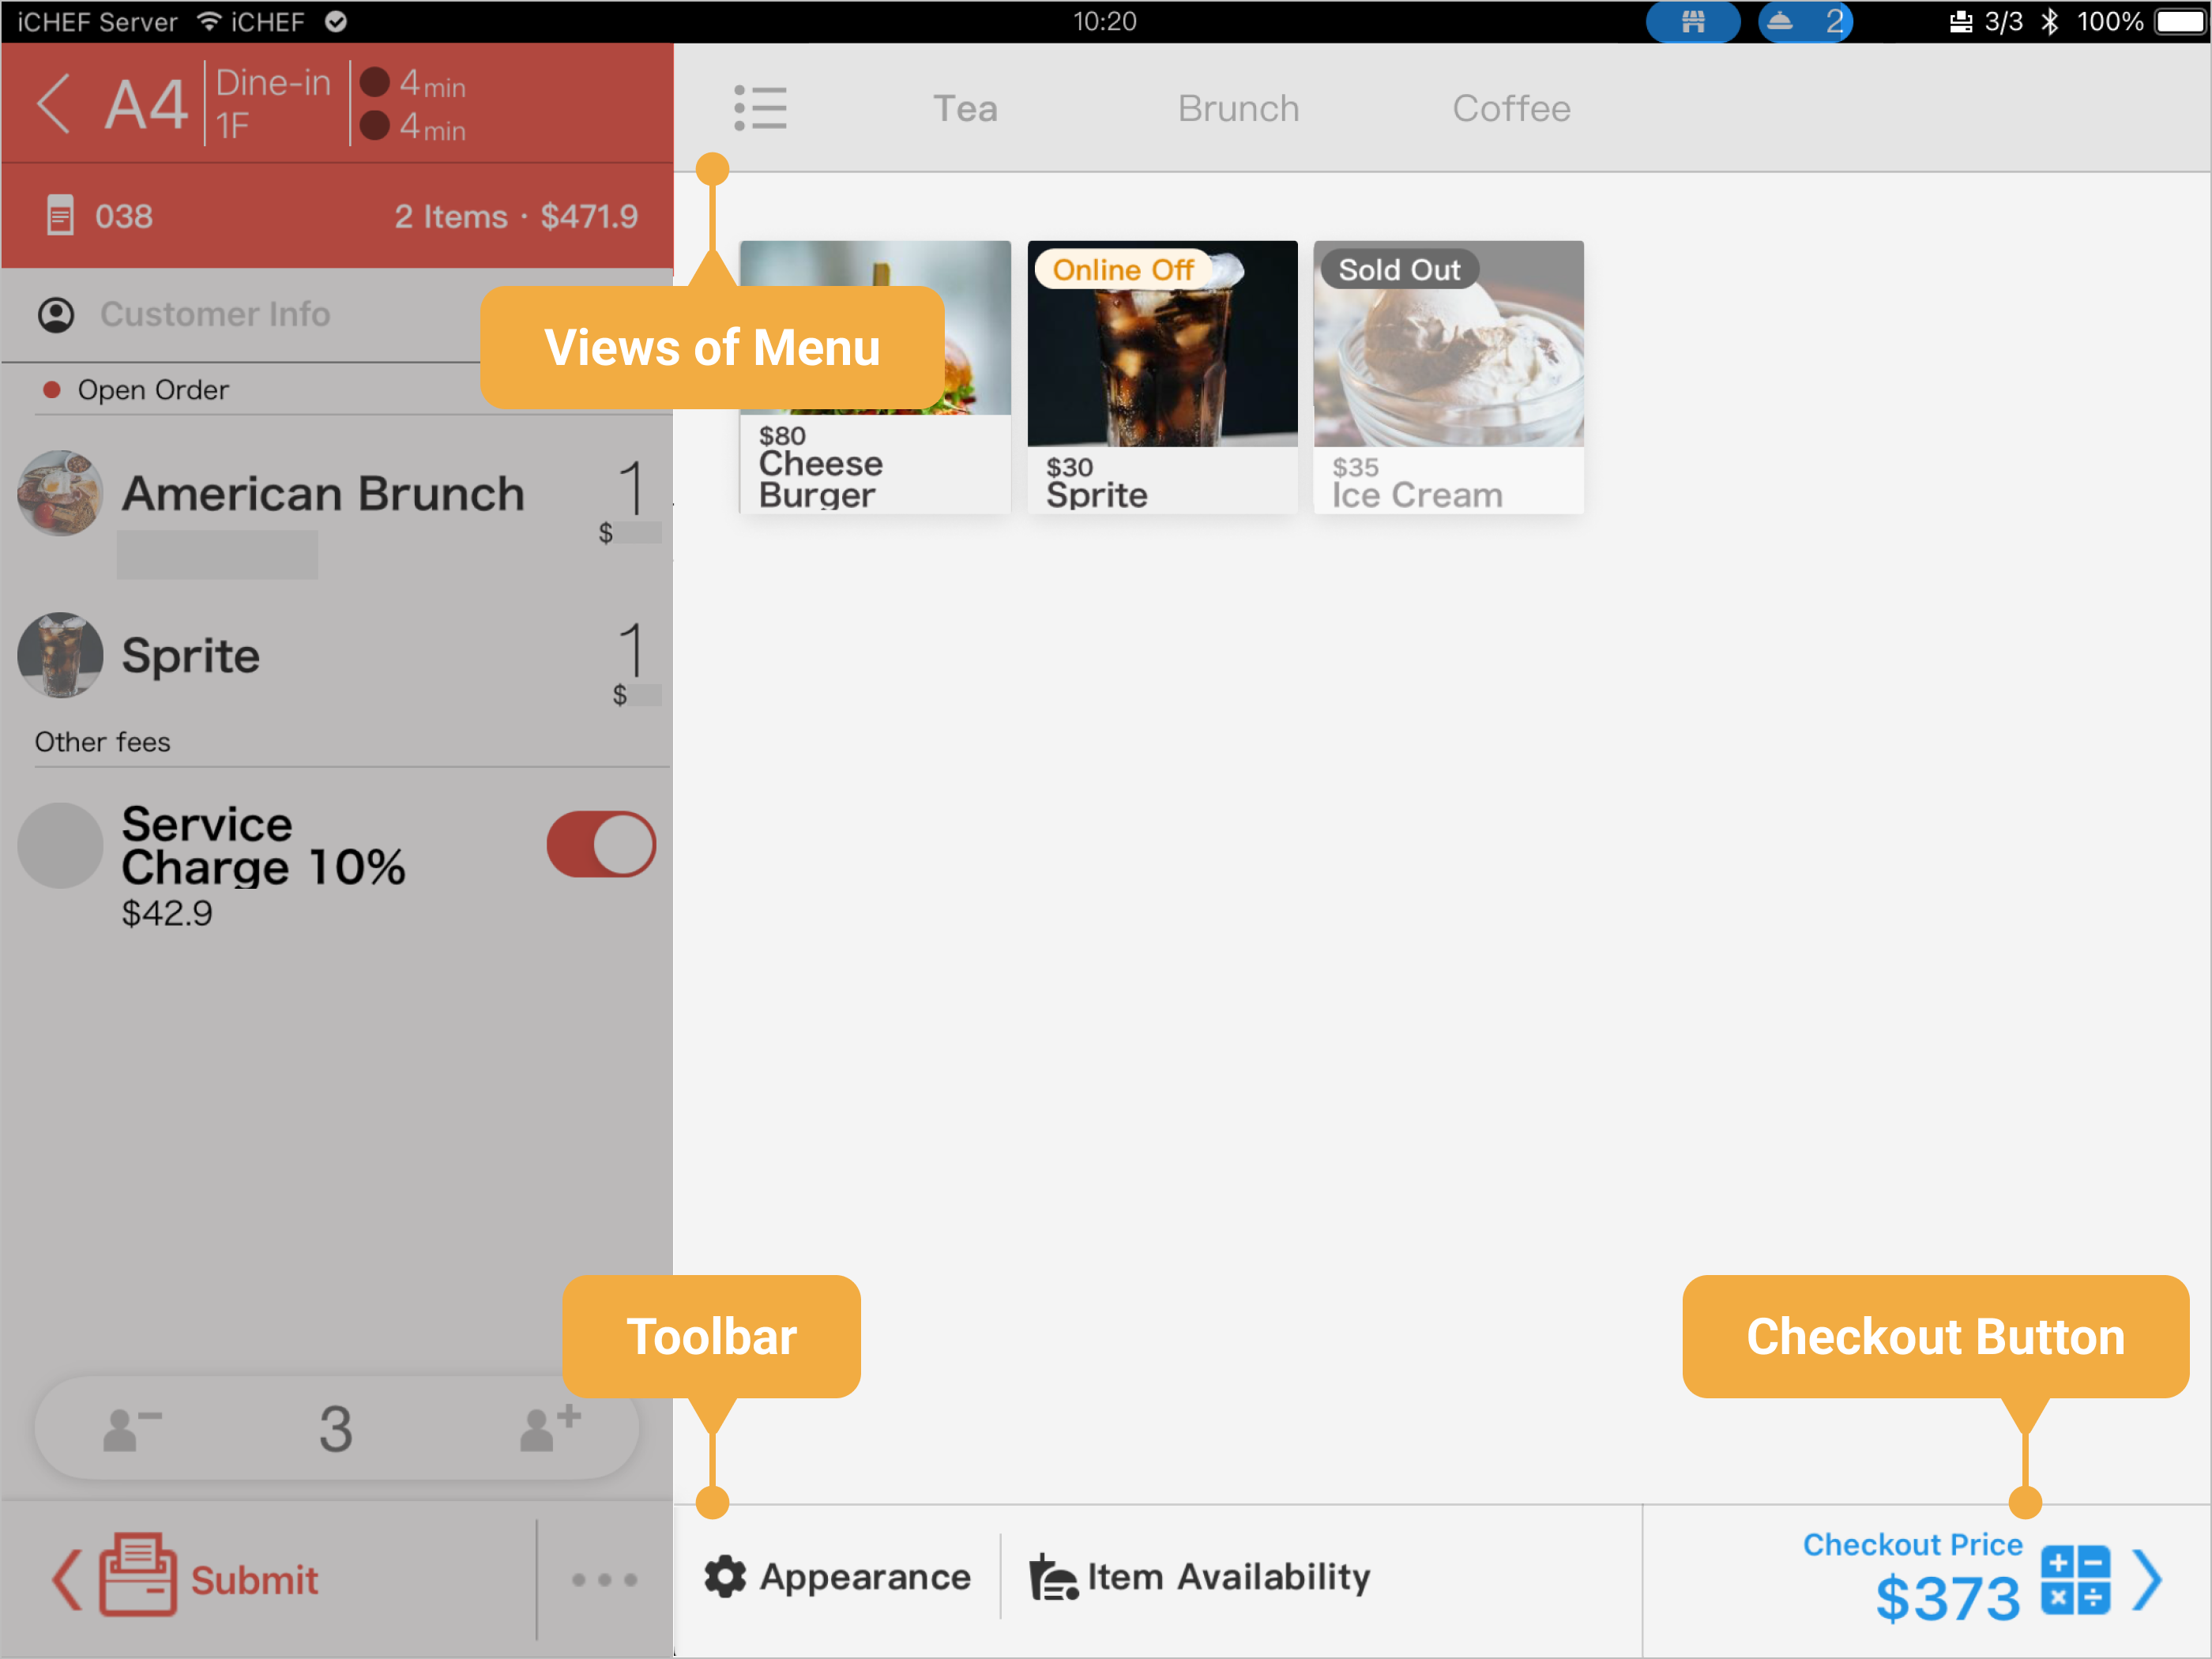
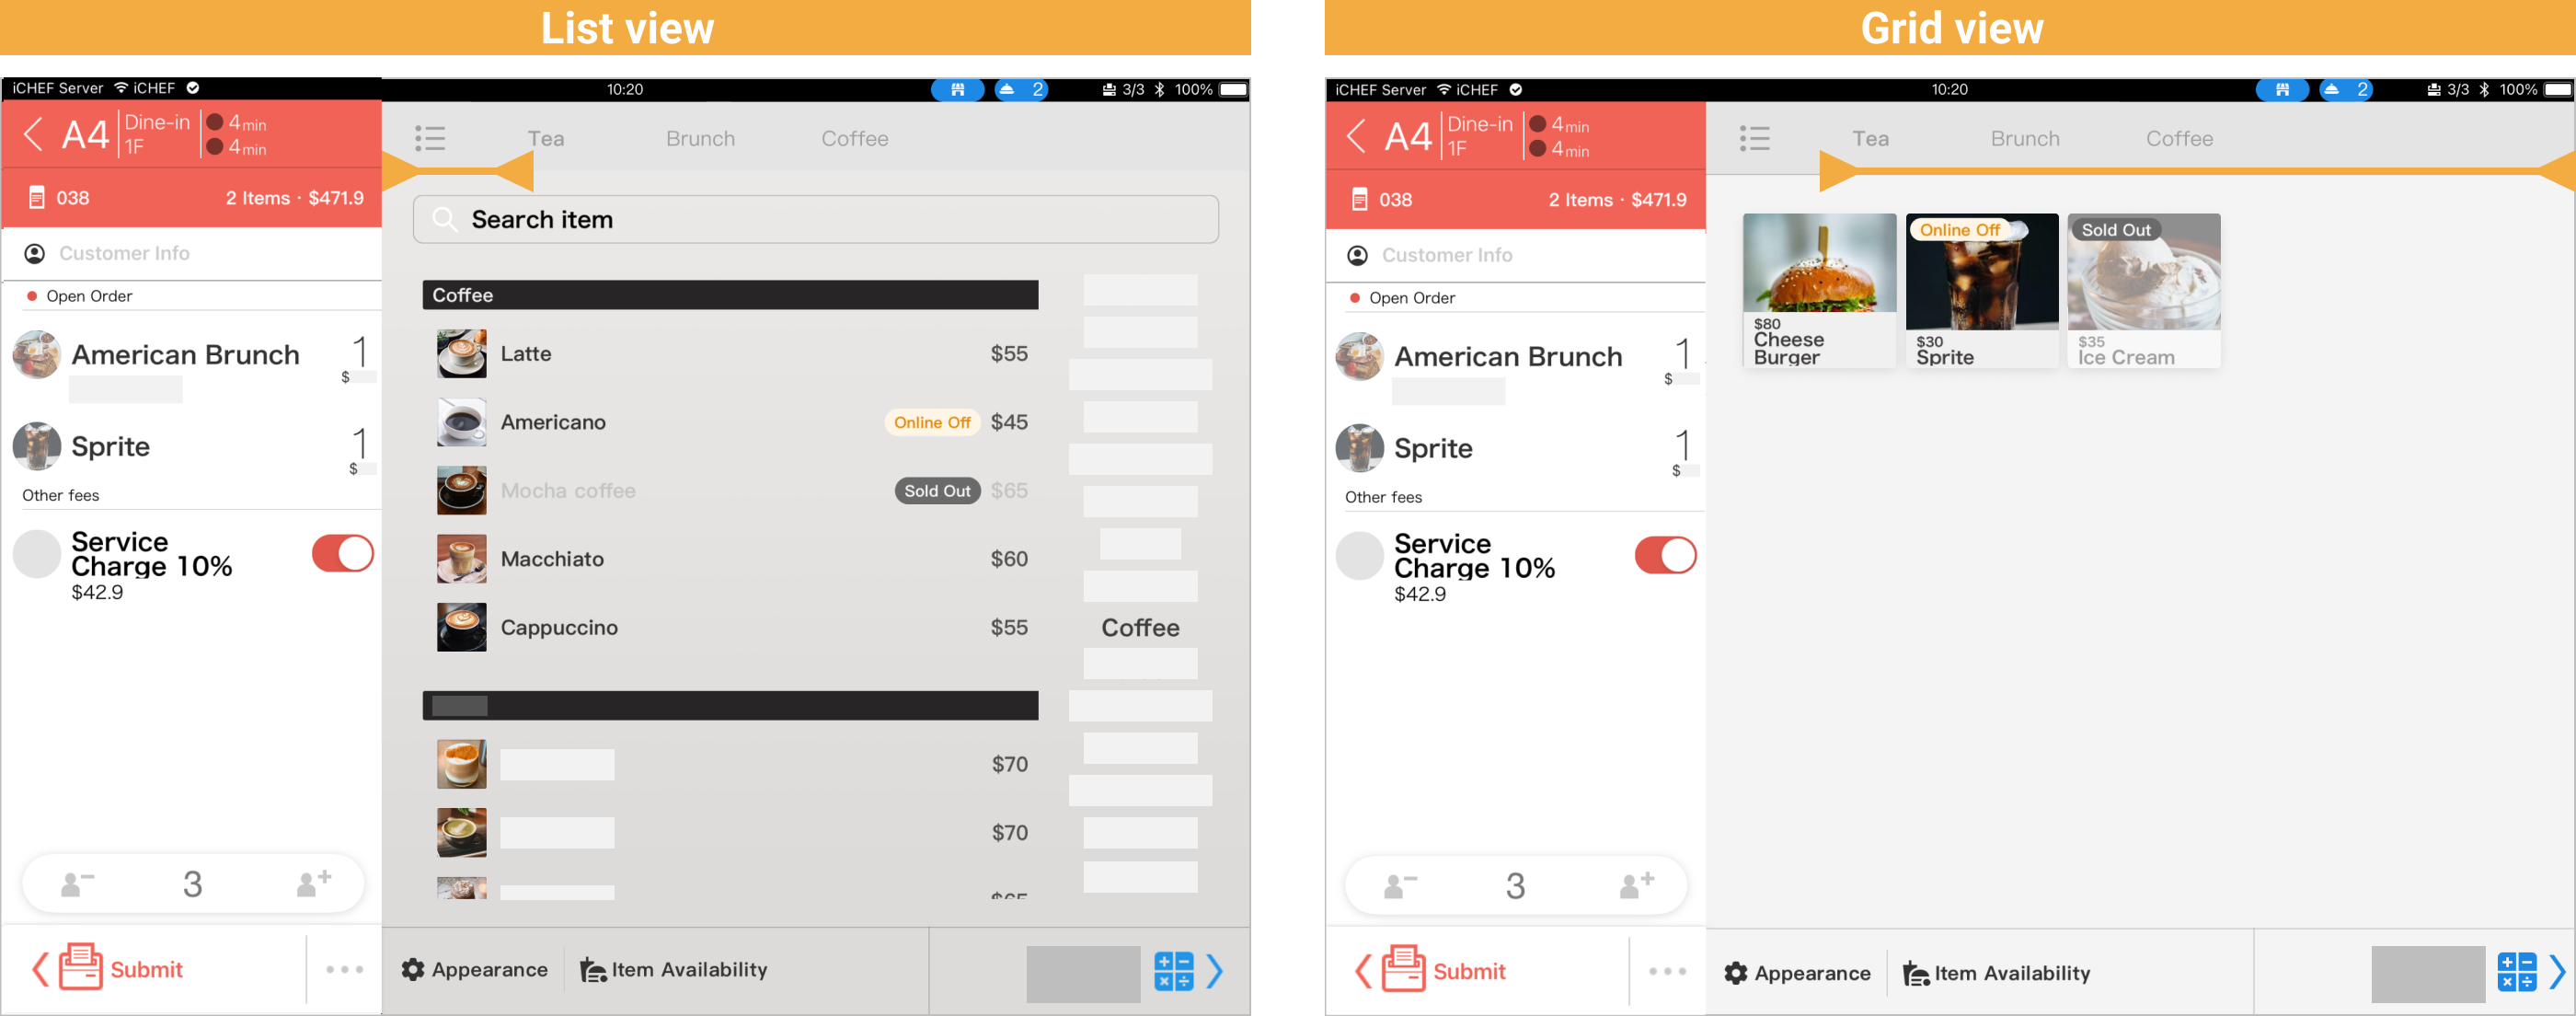
You can switch between the two views from the tab on the top:
- List view: Appears under the first tab and displays all of the items added to [Product Management] from the backend.
- Grid view: Appears under the rest of the tabs and displays the items added to [Menu Settings] from the backend.
❷ Toolbar
The toolbar at the bottom features two functions to facilitate the operation:
- Appearance: You can adjust the font size, font color and images shown on the menu as you like.
- Item Availability: You can do a quick change of the statuses for a real-time update on the POS and online store to avoid overselling! Learn more

- Font size: Slide the dot to adjust.
- Light Mode: When enabled, the overall background is in light color.
- Show Picture: When enabled, the system will display the item images set up from the backend.
- Text Background: When enabled, system will display the item name with a background for better readability.

- Takeout Mode: Operable for Takeout Orders Only.Learn More
- Reload Pictures: When the images are updated or cannot be shown, click this button to reload them.
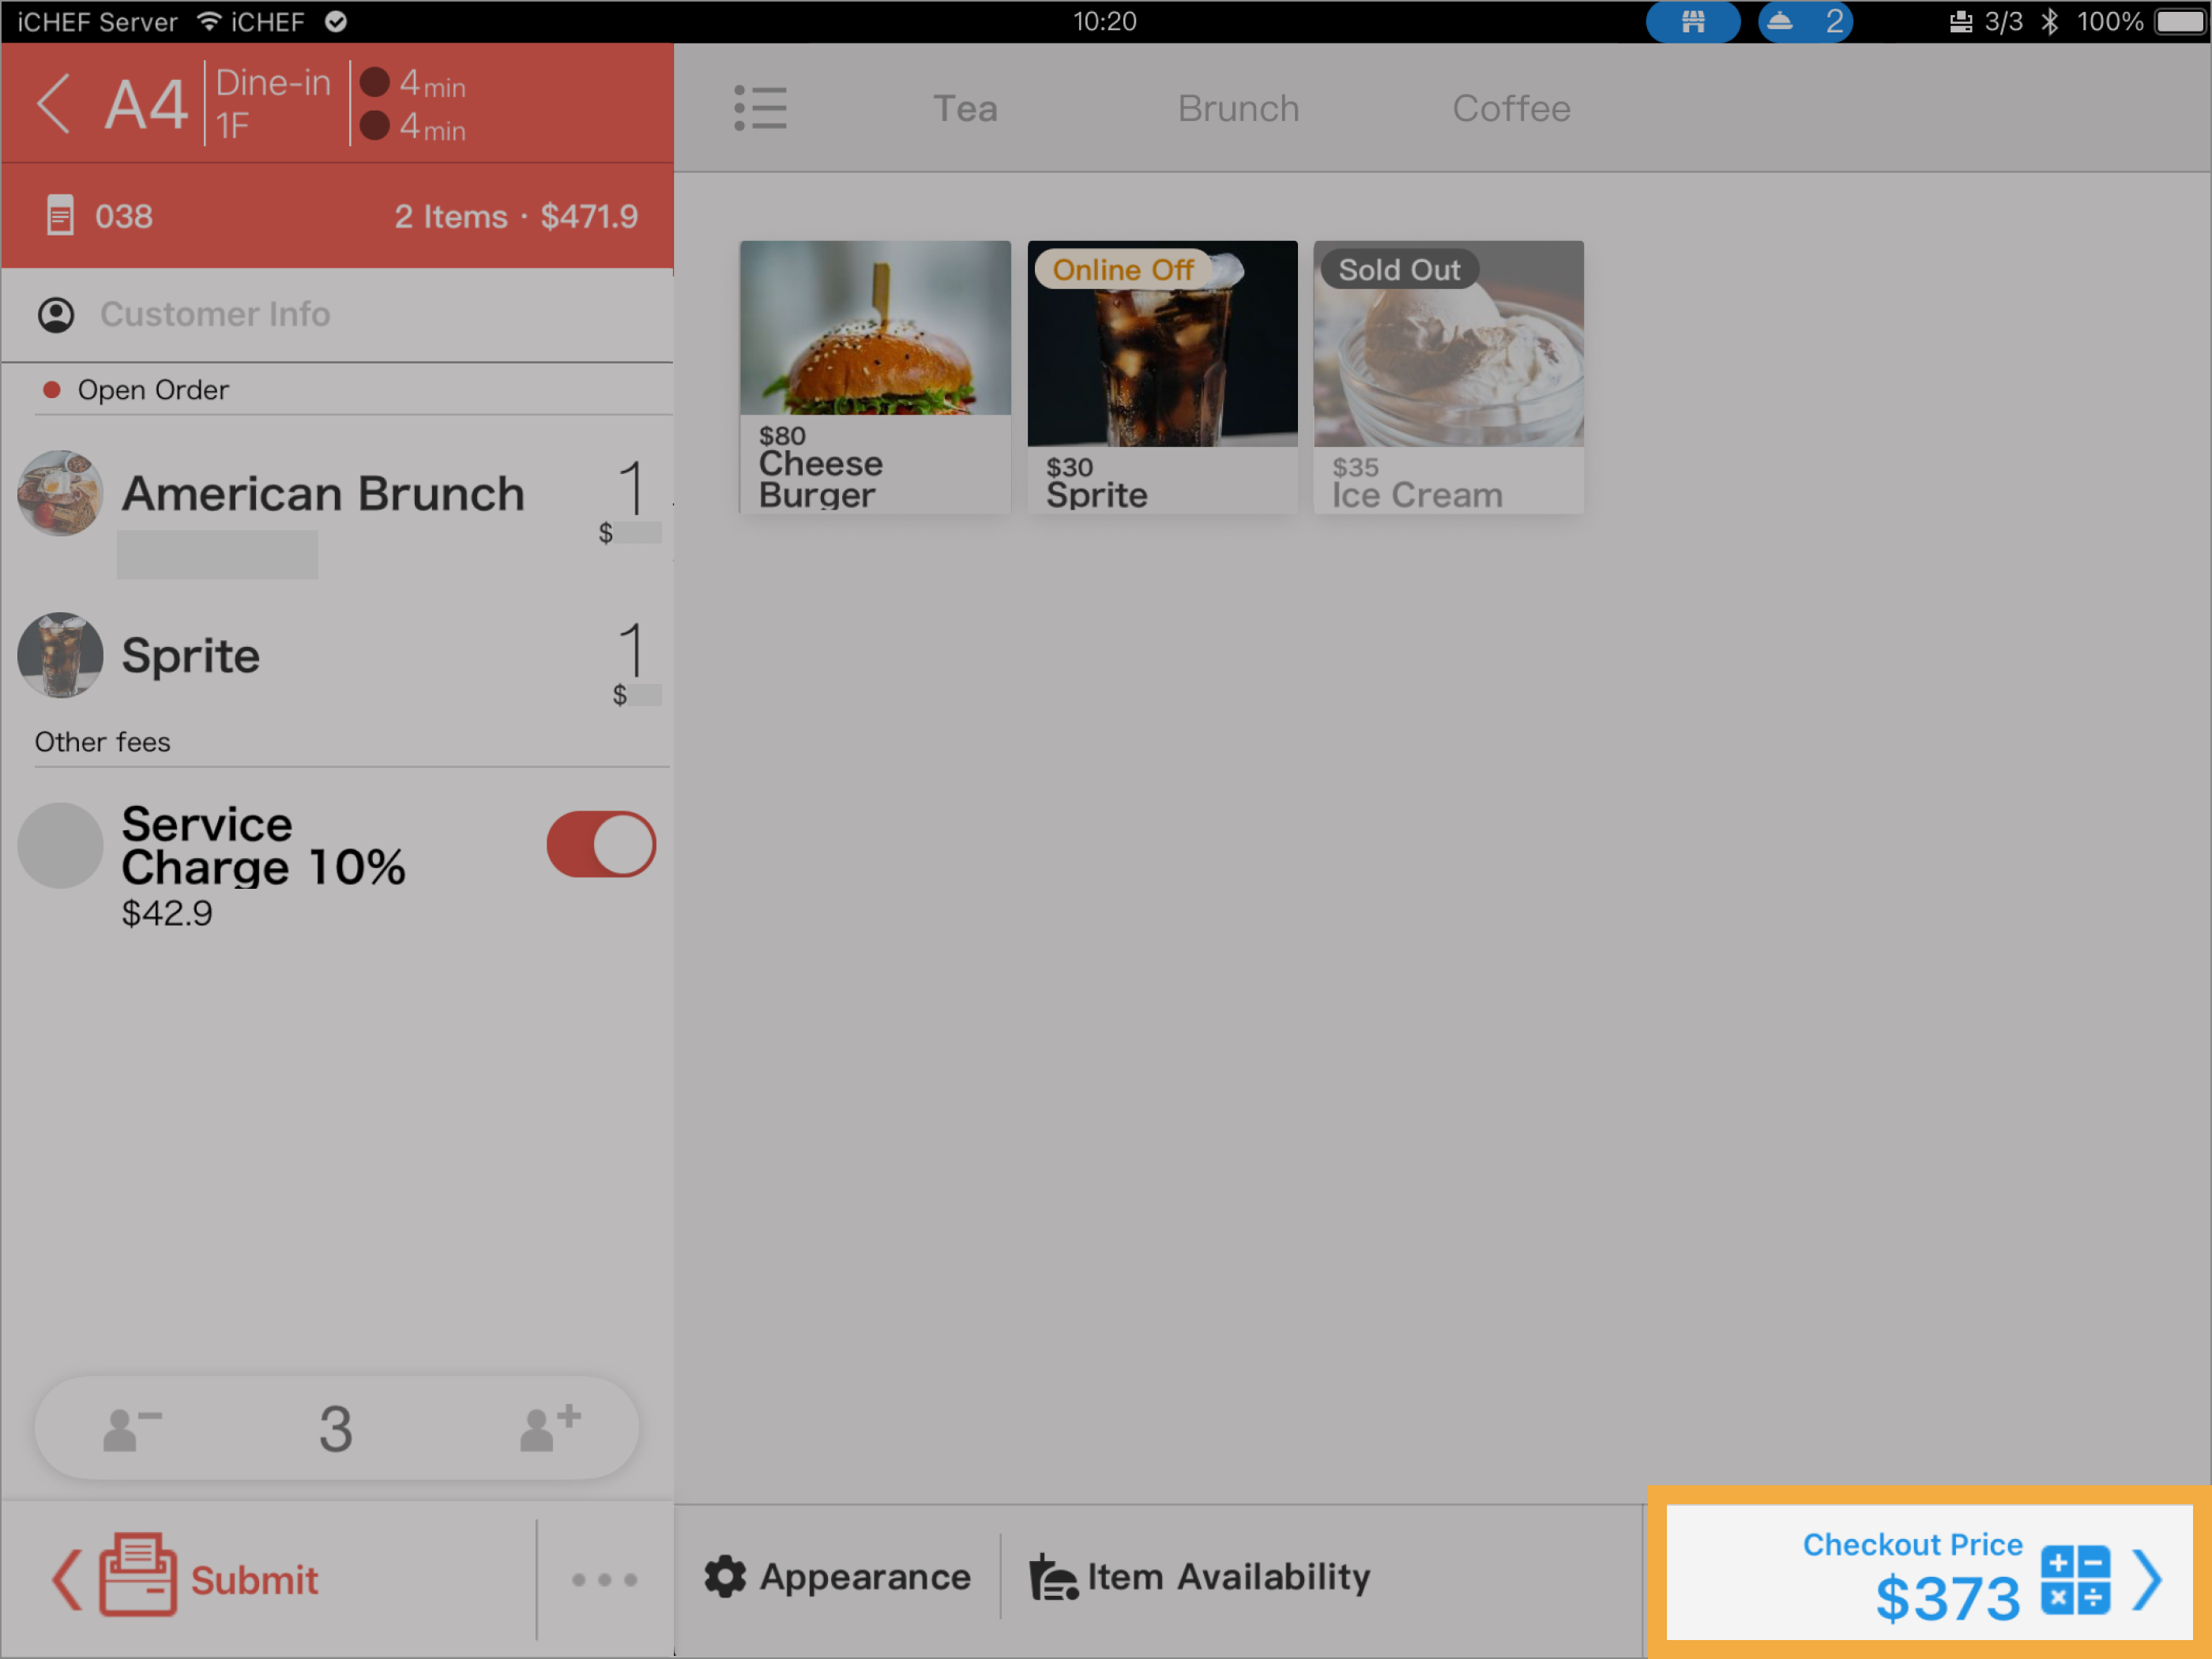
During a complete checkout process, you will go to the discount page, where you can select to apply discounts, and then go tot he checkout page, where you can set up offers for members, select payment method and configure the invoice. The process varies with the way you operate with the checkout button:
- Click once: Enter the complete process (discount page first and then the checkout page).
- Click twice: Skip the discount page and go directly to the checkout page.
- Slide right: Quick checkout (the system will automatically apply the discount you have configured and process the checkout through the prioritized method.)
III. Items Consumed
❶ Order List
Items selected from the menu will be added to the order list. When the item and its notes are identical, A La Carte Items will be merged and displayed as one line. To separate the merged items, slide down and release in the order list area to expand the items.
- Item Quantity: You can manually adjust the item quantity before the order is printed.
- Item Notes: You can set the item’s notes and price adjustments (add/subtract) before the order is printed.
- Item Actions: The options displayed below will be divided into “Before Print” and “After Print.” Please check the Operation Details* to learn more.

Hold
When holding an item, kitchen tickets of this item won’t be printed. Click [Hold] again to lift this status. Then click [Submit] again and the kitchen ticket will be printed.
Edit and reprint
Edit the modifiers for an item. When you complete editing, click [Submit] again to print a cancel ticket and the edited kitchen ticket.
Reprint

After you click [Submit], the same kitchen ticket will be printed again.
Meals served
After serving the meals, mark that item as [Served]. Whether this function is to be operated manually can be set up at the backend. (What is Mark as Served)
Delete

Remove the item from the ordering list. When removing a submitted item, a cancel ticket will be printed to the kitchen after you click [Submit].
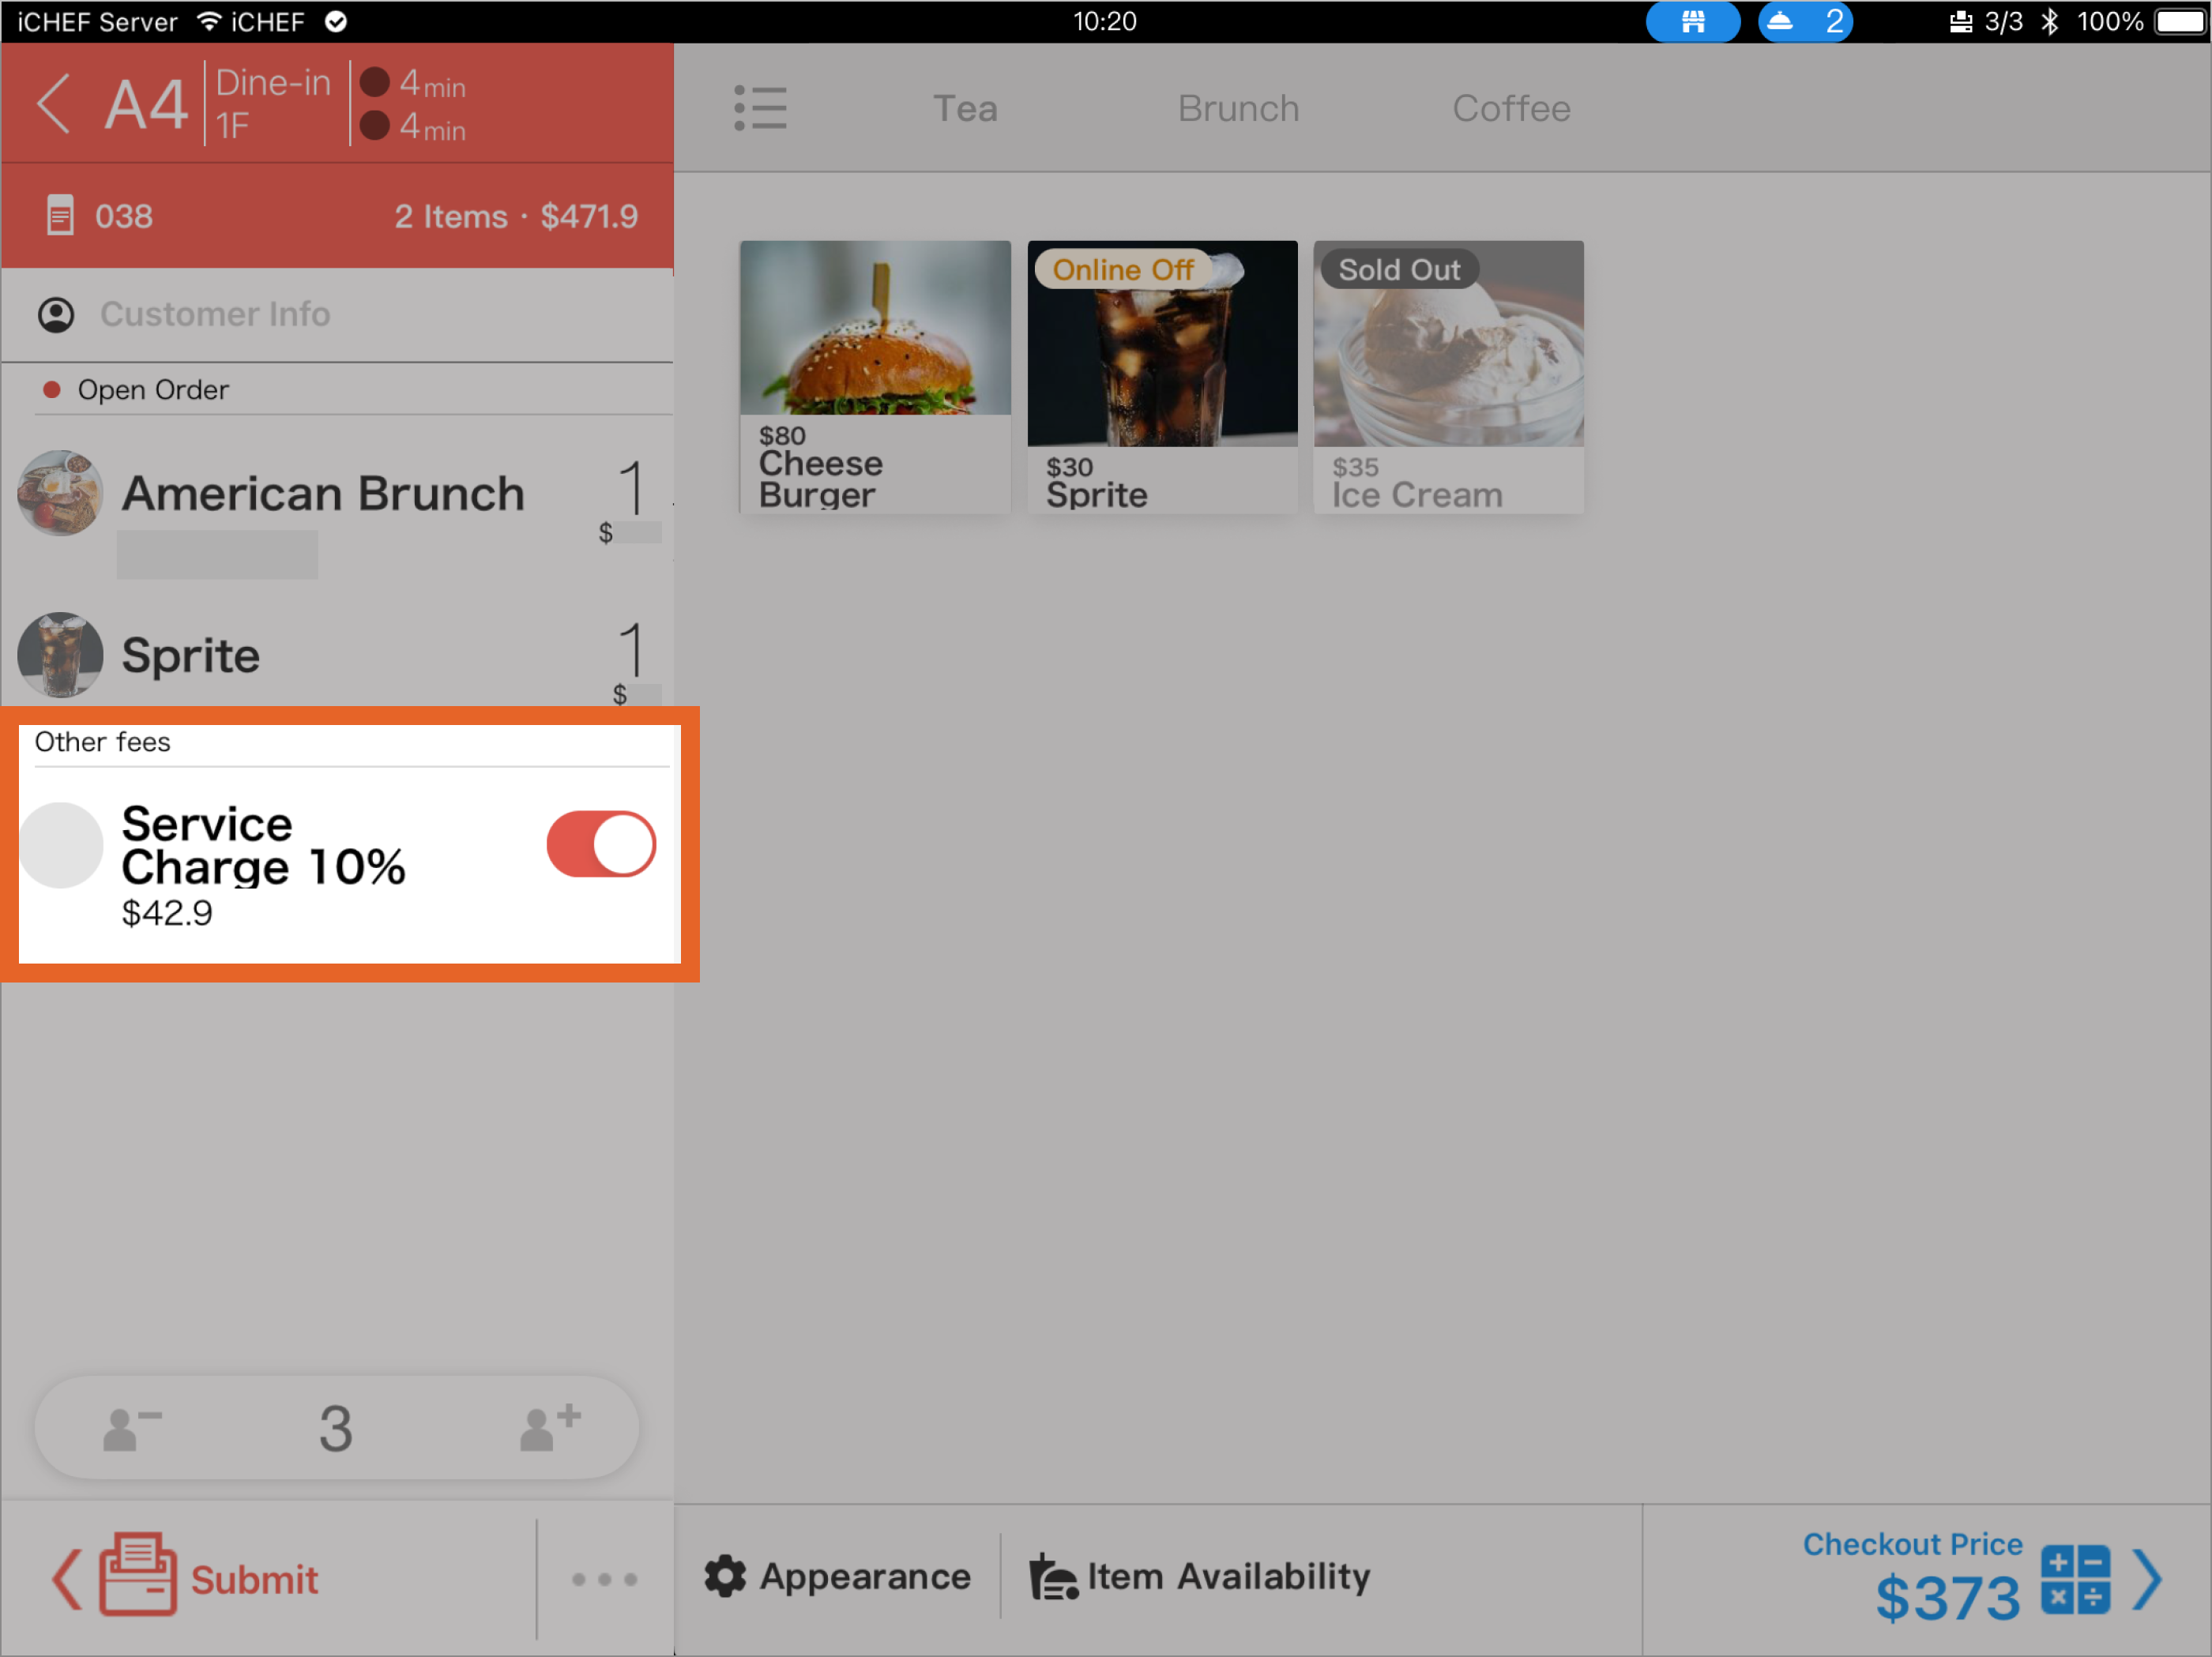
❷ Service Fee Toggle
Depending on your restaurant’s operation model, you can preset the Service Fee function toggle in the iCHEF Backend, and you can set exclusive rates and display names for specific ordering channels.Learn More
❸ Print Order
Once the order information and items are finalized, click the “Print Order” button. The items will be sent to the corresponding receipt printer based on the printing rules, and the screen will return to the floor plan/table status page.Learn More